Teaching Announcements

The aim of the first assignment is to demonstrate an understanding of the Model View Controller design paradigm and the use of Storyboards, and apply it by creating an iOS iPad app. The app should be a Noughts and Crosses iPad application using the iOS 9.0 API. Examples of the final version are given below. If you are unfamiliar with the game, then visit the Wikipedia web page.
Your solution should be based on a Single View Application targeted for an iPad (running in landscape only) using the Objective-C language. As the assignment checks for basic storyboard ability, you should use a storyboard to design all of your interface elements. The game-tokens, or, counters. which indicate each play, should be generated from images in the asset library Assets.xcassets.zip. You should:
-
1)download this file
-
2)unpack it, and then
-
3)copy the resulting directory to your project (under destination, ensure that copy is ticked).
The Model for the game should be realised by creating an instance of a NCGameModel model class (Version 3.0 - revised for this year’s assignment), which is provided in the two files below (again remember to copy the files into your project). It manages the board model, as well as determining whether a game has been won, and tracks the current player. Take a look in the header file for details on how to use the model:
The game should allow a “nought” player to play against a “cross”, i.e. to take it in turn to select a space on the nxn playing area, and position a game-token or counter. The game should proceed until one player wins by forming a line of counters across the board (horizontally, vertically or diagonally from one of the corners), or there are no spaces left (in which case we have stalemate).
Each new game should start by alternating players, and the history of games should be maintained in a table to the right of the board. Players should be able to create a new game by clicking a “Create Game” button (see below), or selecting a previous game in the table to return to that game. The cells in the table should reflect the position of counters in the games they represent; thus the cell representing the current game should be updated whenever a move is made.
Whenever the new game button is pressed, you should use a popover segue to present a view controller than allows the user to select the board size, and then create a new game if the OK button is pressed. You should use an unwind segue to return the board size to the main view controller.
You should ensure that the board can be drawn for games of arbitrary size (e.g. 3 x 3, 8 x8 etc), and that the board can be resized. You should use the default core graphics calls (i.e. using the same graphics primitives as those used in the second tutorial (SketchR). Note that this approach is flexible as it allows the developer to alter the number of columns and easily change the board size.
-
•The Deadline is 6th November at 12 noon.
-
•Your code must be submitted to the departmental electronic submission system at: https://sam.csc.liv.ac.uk/COMP/Submissions.pl?module=comp327
COMP327 - Practical Assignment 1 2015-16
20/10/2015
Deadline: 12 noon Friday 13th Nov 2015
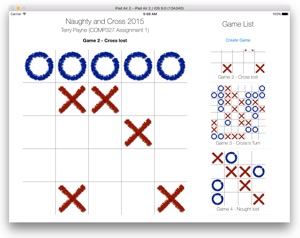
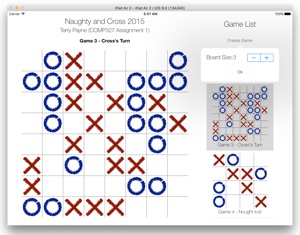
Example Output
Detailed Requirements
The full requirements are given (below):
-
1.Each game should alternate between starting with either naughts or crosses (Note that this is supported for you in the game model files). New games can be created by pressing a “Create Game” button, which should:
-
•use a popover segue to determine the dimensions of the new board;
-
•to select the size of the board, use any of the following objects: UISlider, UIStepper, UIPickerView, UISegmentedControl;
-
•ensure that the range of board sizes is no less than 3;
-
•add the new game board to the bottom of the table of past games;
-
•the new game should appear in the main view;
-
•the turn order should be based on the game number, not based on who won the previous game
-
2.A status label above the main playing area should provide information to the players. In particular, it should:
-
•Indicate what the current game number is (starting from game 1), and who’s move it is next if the game hasn’t been won.
-
•Indicate when the game has been won or if there is a stalemate.
-
•Warn that an illegal move has been attempted (such as the user selecting an occupied space).
-
3.A game-token should appear on the board at the position where the finger was lifted. This should be either the nought or cross image, depending on which player made the move. A user should be able to cancel a move after touching the board, by dragging their finger away from the playing area. The image for the counter should be position the images manually, using a CGContext (see below) onto a view. Do not use UIImageViews on the board from within Interface Builder. However, constructing UIImageViews programmatically is acceptable, though not recommended.
-
4.A “Plain” style table view should be used to keep track of past games. A prototype cell should be added to the table view, which is customised to contain a view representing the game state of each past game, and a status label. The status label should state the game number and whether or not it was won (note - you don’t have to state who’s go it would be next). If a user selects an earlier game, then the main board should represent this game, and the user should be able to continue playing the game.
-
5.The application should be created with the following characteristics:
-
a.Each class you create should be prefixed with your username (except the View Controller for the main scene).
-
b.Use ARC to manage memory.
-
c.Use storyboards.
-
d.DO NOT develop Unit Tests.
-
e.Create an Single View project.
-
f.Set the target device as iPad.
-
g.Set the language to be Objective-C
-
h.Name your project Noughts2015.
-
i.Make sure your name appears in a label on the main scene.
-
j.Select only landscape orientations for your project.
This assignment contributes 15% to your overall mark for COMP327. The code should compile without warning or errors. In addition, all of the source and resource files should be included in your project.
You should implement a UIView class, called prefix-GameAreaView that is responsible for displaying the board and counters. You will also need to create a custom cell called prefix-GameCell The game itself should be managed using the default ViewController instance, and the game model should be handled by the (supplied) Game model.
You can use any version of Xcode 7 running under any version of iOS 9 or later.
Marking Scheme
The purpose of this assignment is to demonstrate that you know how to develop native iPad app using Storyboards and touch events. You do not need to hand in any design documentation but your code MUST be well commented so that it explains what is happening in the code. The following marking scheme will be used to assess each submission:
-
•View Controller: (20 marks total)
-
•Demonstrate an understanding of using IBOutlets and IBActions, by drawing the main view, including an instance of the GameAreaView, status label, and “Start Game” button, and managing this using a view-controller (10 marks)
-
•Capturing touch events and positioning the correct game-tokens in the Game Model, including detecting illegal moves (10 marks)
-
•Table View Controller and Custom Cell: (30 marks total)
-
•Constructing a Table View to represent past games, including a single entry when the application starts, and adding a new entry when the “Start Game” button is pressed (10 marks).
-
•Constructing and using a custom cell that displays past game positions in the cells of that table view (10 marks)
-
•Presenting a ViewController using a Popover segue to determine the board size, and an unwind segue to return the size (10 marks)
-
•GameAreaView: (20 marks total)
-
•Draw the board (or represent the image of the board), and counters on the board based on the status of the Game Model. (20 marks)
-
•General: (30 marks total)
-
•Ensure that the code does not include fixed board sizes, but can handle sizes other than 3x3 (10 marks)
-
•Adhering to all of the requirements and submission guidelines, and including all resources and sources in your submission (10 marks)
-
•Design/Style and Layout (10 marks)
Hints
-
1.The solution to this assessment will be similar in style to that for the SketchR and the KingsNQueens tutorials (i.e. Chapters 2 & 3 in the eBook). Ensure that you have understood these before attempting the assignment
-
2.Use a freeform size’d scene for the view controller that appears from the popover segue. This can be any size, but my solution assumes a scene of size 280 wide by 120 high.
-
3.Ensure that the board can represent the correct number of counters on the board, but when scaling the counters, maintain the correct aspect ratio.
-
4.The following code fragment draws a UIImage for one of the two counters at some position within the board. Feel free to use this, but try to understand how it works...
- (void)drawCounterAtPosition:(int)position isNought:(BOOL)noughtType {
// This code fragment assumes that the property gameModel returns an instance of NCGameModel
// Get the size of the current view and calculate the size of each position in the board
CGRect bounds = [self bounds];
NSInteger boardSize = [[self gameModel] boardSize];
CGSize cellSize = CGSizeMake(bounds.size.width/boardSize, bounds.size.height/boardSize);
// Check the size of the counter images
UIImage *myImage = (noughtType?[self noughtImage]:[self crossImage]);
CGSize imageSize = [myImage size];
// Calculate a scaling, to fit the image into a board cell, and create a scaled version of the image
double scaleFactor = MAX(imageSize.width/cellSize.width, imageSize.height/cellSize.height);
UIImage *scaledImage = [UIImage imageWithCGImage:[myImage CGImage] scale:scaleFactor orientation:UIImageOrientationUp];
// Draw the scaled image in the correct cell
CGPoint myPoint;
myPoint.x = (cellSize.width * (position % boardSize));
myPoint.y = (cellSize.height * (position / boardSize));
[scaledImage drawAtPoint:myPoint];
}
-
5.Make good use of lazy instantiation, such as to load in the images (and then store them internally) within the GameAreaView class when they are first used. Note that the code fragment in point 4 (above) could be improved by scaling the images within the getter methods when called for the first time!
-
6.It is relatively easy to convert touch events into positions within the game model by using integer maths. The following code fragment takes a touch event and the gameAreaView instance, and based on a game model, determines a position:
// =========================================================================
// Returns -1 if no valid position was found
- (NSInteger) getPositionFromTouch:(UITouch *)touch inView:(UIView *)myView {
NSInteger boardSize = [[self currentGameModel] boardSize];
CGPoint touchPoint = [touch locationInView:myView];
CGRect myViewsBounds = [myView bounds];
// Check if the touch is still within the bounds of this view
if ((touchPoint.x > 0) && (touchPoint.x < myViewsBounds.size.width) &&
(touchPoint.y > 0) && (touchPoint.y < myViewsBounds.size.height)) {
CGSize cellSize = CGSizeMake(myViewsBounds.size.width/boardSize,
myViewsBounds.size.height/boardSize);
return (boardSize * (int) (touchPoint.y / cellSize.height))
+ (int) (touchPoint.x / cellSize.width);
}
return -1;
}
-
7.UITableViews work very well when coupled with arrays of objects. Create a mutable array of game models, and ensure that the game shown on the main scene presents the selected object from the table.
-
8.Scrolling down to the last element in an array is easy; use the following method where indexPath is set to the value of the last element of the table
scrollToRowAtIndexPath:indexPath atScrollPosition:UITableViewScrollPositionBottom animated:YES
-
9.Remember to call reloadData whenever the array of game models changes size, and when a move is made (so that the currently selected table cell reflects the move). Also remember to call setNeedsDisplay if the game model changes, so that the board is updated.
-
10.Look carefully at the header file NCGameModel.h as it gives details of how to use the methods and properties. Also take a look at the code inside NCGameModel.m to see what it actually does.
-
11.Use the factory method modelWithBoardSize: to construct a new game model; this method also sets the value of the currentPlayer automatically.
-
12.The only methods needed to modify the game model are addCounterAtPosition: (which will also automatically update the currentPlayer) and getCounterAtPosition:. All other characteristics of the model can be checked using getter properties.
Other hints may be given in the lectures...
SUBMISSION INSTRUCTIONS
Firstly, check that you have adhered to the following list:
-
1.Your project should be self contained within a single zip file containing all of the files in the XCode project. The file's name MUST be 'Noughts2015.zip'. Ensure that all of your source files and resources are included in the project (hint, unpack it in a different directory and check it still builds).
-
2.Your project is developed within XCode, not some other language or environment.
-
3.Your program compiles and runs on a machine within the computer science department’s Mac Lab. If you have developed your code elsewhere (e.g. your own mac), ensure that it also works on our system before submission. It is your responsibility to check that you can log onto the department’s system well in advance of the submission deadline.
-
4.Your program does not bear undue resemblance to anybody else's! Electronic checks for code similarity will be performed on all submissions and instances of plagiarism will be severely dealt with. The rules on plagiarism and collusion are explicit: do not copy anything from anyone else’s code, do not let anyone else copy from your code and do not hand in 'jointly developed' solutions.
To submit your solution you must SUBMIT IT ELECTRONICALLY, and adhere to the following instructions:
Electronic submission:
-
•Your code must be submitted to the departmental electronic submission system at: https://sam.csc.liv.ac.uk/COMP/Submissions.pl?module=comp327
-
•You need to login in to the above system and select ‘Assignment 1’ from the drop-down menu. You then locate the file containing your program that you wish to submit, check the box stating that you have read and understood the university’s policy on plagiarism and collusion, then click the ‘Upload File’ button.
Work will be accepted only if it is submitted electronically following the above instructions.
Plagiarism will not be tolerated. There are several ways in which this can be detected from the project files submitted, so don’t do it!
Finally, please remember that it is always better to hand in an incomplete piece of work, which will result in some marks being awarded, as opposed to handing in nothing, which will guarantee a mark of 0 being awarded. Demonstrators will be on hand during the COMP327 practical sessions to provide assistance, should you need it.