2013/14
The following lab will explore the use of Location-Aware computing and data persistence using plists. It allows you to get geospatial information about the user, and make use of the MapKit to display maps and generate annotations in a map. In addition, mechanisms for getting data from a user, by using a modal view controller to present a window developed for data entry, and introducing the need for delegates when using Text Fields. A UITabBarController is also used to present two different view controllers, that manage similar data.
Lab 6 - WhereAmI (13/14)
09/12/2013

Introduction
The WhereAmI Lab explore the use of data persistence through simple plists, and the notion of location-aware computing. It relies on a working knowledge of the creation and manipulation of table views, and will provide you with the opportunity to develop an initial app that exploits two views within a UITabBarController, and explore how to use Core Location to determine the current position, and view this graphically using MapKit. You will also be walked through the process of creating a modal view designed to get data from the user, and using textviews.
Todays Tasks:
Walkthrough - Step 1: Create a new App and manage two view controllers.
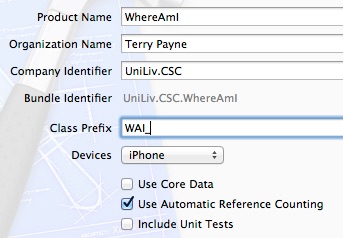
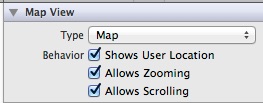
Start by creating two new controllers - these will be used within our tab bar controller. The first should be called “WAI_LocationsTableVC” and should be a subclass of a UITableViewController (with no nib file). The second should be called “WAI_MapVC”, and should be a subclass of a UIViewController with a nib file (for iPhone). Open up the nib, and insert a UILabel with the text “Map View” - this is just a placeholder for now to identify the currently active view controller.
Each view controller managed by a UITabBarController defines its own title and image to appear in the Tab Bar. These should be defined when the view controllers are initialised (not loaded), so add the following lines (below) to the initialisation methods of both view controllers. Make sure you put these in the correct method; if you put these in viewDidLoad by mistake, then only the first tab will be labelled; and the second will be labelled only after it has been selected.
In the WAI_MapVC.m initWithNibName:bundle: method, add:
// Custom initialization
[self setTabBarItem:[[UITabBarItem alloc] initWithTitle:@"Map" image:[UIImage imageNamed:@"103-map.png"] tag:0]];
In the WAI_LocationsTableVC.m initWithStyle: method, add:
// Custom initialization
[self setTabBarItem:[[UITabBarItem alloc] initWithTitle:@"Locations" image:[UIImage imageNamed:@"74-location.png"] tag:1]];
-
•Location Image (74-location.png)
-
•Map Image (103-map.png)
_files/74-location.png)
_files/103-map.png)
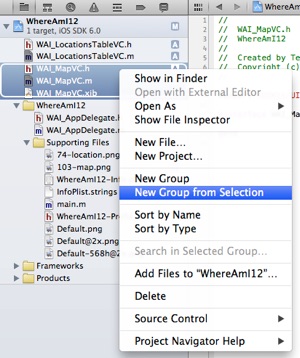
Note - it is possible to group files together within the file list to organise them. This does not move the files within the directory structure, or move them around the file system, but it can aid development, by putting all the files and resources associated to a given task or View Controller into a single group. For example, in the image opposite, the files associated with the WAI_MapVC Map have been grouped together in a group called “MapVC”. To create a group, select the files that should belong to the group, and right-click the mouse. From the menu, select the option “New Group from Selection”, and it will create a group, which you can then add files to, or rename.
Now we have our two initial view controllers, we want to add them to a UITableViewController within the App delegate. Include the header files of the two view controller classes within WAI_AppDelegate.m, and modify the application:didFinishLaunchingWithOptions: method. Start by creating an instance of the table view controller subclass. Then create an instance of the WAI_MapVC , before packaging them within an array, and passing this through to a UITabBarController. Finally, set the UITabBarController as the root view controller, compile the code, and run.
// ==========================================================
// Override point for customization after application launch.
WAI_LocationsTableVC *locTableVC = [[WAI_LocationsTableVC alloc] initWithStyle:UITableViewStylePlain];
WAI_MapVC *mapVC = [[WAI_MapVC alloc] initWithNibName:@"WAI_MapVC" bundle:nil];
UITabBarController *vc = [[UITabBarController alloc] init];
[vc setViewControllers:@[mapVC, locTableVC]];
[[self window] setRootViewController:vc];
// ==========================================================
When you test your code - you should see two tab bars; one with the map view, and the other an empty table.
Walkthrough - Step 2: Set up Core Location, and obtain the current location.
The two frameworks: Core Location and MapKit provide support for obtaining location-based information for the device, and displaying maps and annotations graphically, as well as support for geocoding location data (i.e. converting lat/long coordinates to street-level addresses, and vice versa). However, to use these frameworks, they will need to be included in your project.
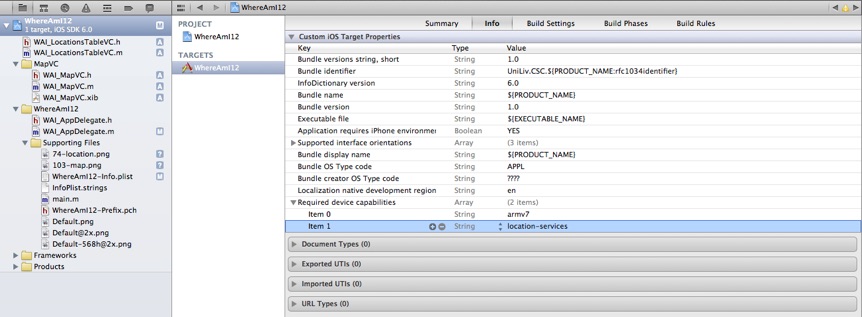
Before we do this, however, we should be mindful that not all devices can determine the user’s location. There is a key in the application’s Info.plist what capabilities the device should have in order to run the app. That way, the app won’t run on the device if the device can’t support it; in fact the app won’t even show up in the App Store should you release it. In Xcode, select the name of your project in the file list, to display the project summary. Then, in the main window, select “WhereAmI12” under Targets, and open Info. Open the “Custom iOS Target Properties” section , find the key called “Required device capabilities” and open it. Select Item 0 and click the round “+” button that appears. Then under the Value column, enter location-services. It should look something like this:
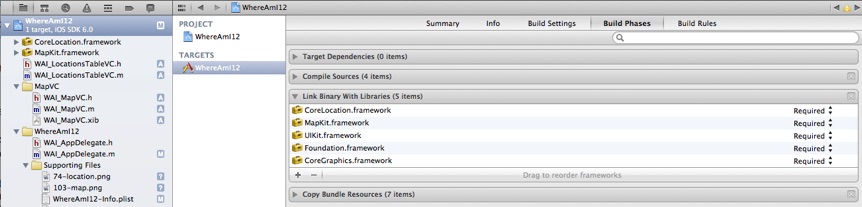
We next want to link the two frameworks to your project. Select “Build Phases”, and open the section on “Link Binary With Libraries”. You will notice that there are already several frameworks linked to your project, including UIKit and Foundation (which are included in every project). Use the “+” button to add: “CoreLocation.framework”, and “MapKit.framework”.
We can now make use of the API for each framework within our project. The next phase involves setting up Core Location to update the current location of the device on a map in the view controller, to check that this is working. We’ll start by creating a location manager object, and configure its desired accuracy and distanceFilter properties. We will then create the delegate methods locationManager:didUpdateToLocation:fromLocation: and locationManager:didFailWithError:, which will be called if there is a change to the users location, or problems with obtaining the current location respectively. These will then be used to display the current latitude and longitude on a map.
Start by importing <CoreLocation/CoreLocation.h> in your WAI_MapVC.h header file (we’ll need this later to define the CLLocationManagerDelegate protocol), and include the the ivar/property for a location manager:
@property (nonatomic, strong) CLLocationManager *locationManager;
We’re going to use the lazy instantiation design pattern again with this property (we previously saw this pattern in the KingsQueens Navigator Lab). Create the getter method locationManager to obtain the current location manager object, initialising it if necessary. Start by checking to see if the object exists - if it doesn’t exist, then we need to create and configure it. There are three main properties that will need defining:
-
•The desired accuracy - the accuracy of the location data. This can also affect the time required, and power requirements of the location-aware hardware in the device; low accuracy settings typically require less power (and can often be very efficient, if only significant location change notification changes are required).
-
•The distance filter - This corresponds to the minimum distance (measured in meters) a device must move horizontally before changes to the location are sent to the delegate
-
•The delegate - the object to which changes to the location are sent
In this case, we want relatively high accuracy, with a distance filter of 25 meters, and use “self” as the delegate.
// =================================================
#pragma mark - Core Location Methods
- (CLLocationManager *)locationManager {
if (_locationManager == nil) {
_locationManager = [[CLLocationManager alloc] init];
[_locationManager setDesiredAccuracy:kCLLocationAccuracyNearestTenMeters];
[_locationManager setDistanceFilter:10];
[_locationManager setDelegate:self];
}
return _locationManager;
}
As the view controller will act as the location manager’s delegate, we need to adhere to the location protocol CLLocationManagerDelegate, and implement the protocol methods. Update the interface definition in the header file to use the CLLocationManagerDelegate protocol:
@interface WAI_MapVC : UIViewController <CLLocationManagerDelegate>
and implement the following methods in the source file:
#pragma mark - Core Location Delegate Methods
- (void) locationManager:(CLLocationManager *)manager
didUpdateToLocation:(CLLocation *)newLocation
fromLocation:(CLLocation *)oldLocation {
// Ensure that if we do something here, it is because we *are* in a different location
if (([newLocation coordinate].latitude == [oldLocation coordinate].latitude) &&
([newLocation coordinate].longitude == [oldLocation coordinate].longitude))
return;
NSLog(@"WAI_MapVC new location: latitude %+.6f, longitude %+.6f\n",
[newLocation coordinate].latitude,
[newLocation coordinate].longitude);
}
The above method is called when there are new location events; i.e. the user has moved at least distanceFilter meters from the previous position. For now, we display the coordinates in the log. Note that the object returned from calling coordinate on the newLocation object returns a CLLocationCoordinate2D, which is defined as a C struct (similar to a CGRect), and not an Objective-C object. Hence we access the elements using the C dot notation.
- (void) locationManager:(CLLocationManager *)manager didFailWithError:(NSError *)error {
// For now, do nothing other than report to the log
NSLog(@"Unable to get location events");
}
This method is called if there are problems with obtaining device’s current location. Although optional, it can be used to determine why there were problems (such as the user disabling location services, or temporarily not being able to access the location). For now we will do nothing, other than report the case to the log. Later, we will use this to disable any location activities (such as disabling a button the user could use to record the current location).
- (void)viewWillAppear:(BOOL)animated
{
[super viewWillAppear:animated];
NSLog(@"WAI_MapVC about to appear");
[[self locationManager] startUpdatingLocation];
}
- (void)viewWillDisappear:(BOOL)animated{
[super viewWillDisappear:animated];
NSLog(@"WAI_MapVC about to disappear");
[[self locationManager] stopUpdatingLocation];
}
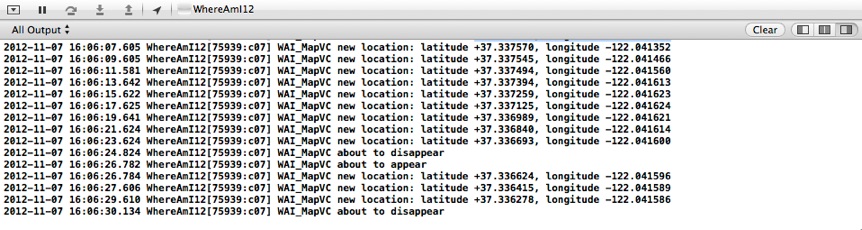
We’ve included log messages to verify that these methods have been called. These can be deleted at a later stage.
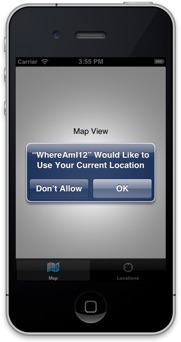
Compile and Run. The simulator will ask whether the application should use the current location. Select OK. After this, log messages will be generated (see below). If you change tabs, you will see this reflected in the log, and the location messages will stop being updated.
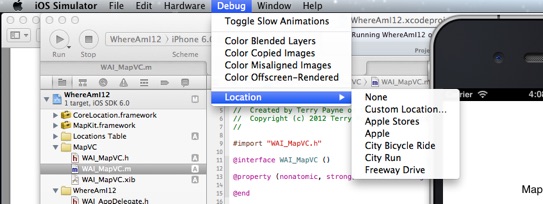
In the remainder of this lab, we will assume that “City Bike Ride” has been chosen.
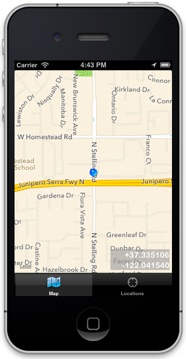
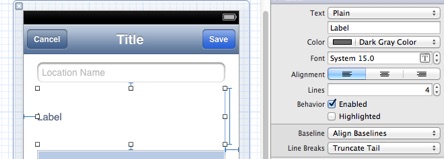
Finally, modify the WAI_MapVC.xib file so that the latitude and longitude can be displayed within two UILabels (latitudeLabel and longitudeLabel). Update the class definition accordingly, and check that the labels reflect the current location (you can now remove the NSLog messages if you like. The next step is to display this location on a Map.
As map views show a region of a map in a rectangular area, we need to define a region for the map to zoom to, given some coordinate and scale. We can do this using the method MKCoordinateRegionMakeWithDistance, which creates a new region given the location of the central point, the north-south distance (measured in meters) and the east-west distance (measured in meters). This region is then used to create a second region based on the dimensions of the map view in the nib file. The method regionThatFits: adjusts the aspect ratio of the specified region to ensure that it will fit into the map view. Now we have a finalised region, we can tell the map view to display the specified region.
Add the following code to the locationManager:didUpdateToLocation:fromLocation: method, after having set the latitude and longitude values within the labels.
MKCoordinateRegion viewRegion = MKCoordinateRegionMakeWithDistance([newLocation coordinate],
0.5*METERS_PER_MILE, 0.5*METERS_PER_MILE);
MKCoordinateRegion adjustedRegion = [[self mapView] regionThatFits:viewRegion];
[[self mapView] setRegion:adjustedRegion animated:YES];
Note that we have the symbol METERS_PER_MILE in the code, which will cause the editor to complain, and will cause the compiler to fail. This symbol represents the number of meters per mile, so that we can define a region in terms of miles. In the above code, we started by generating a half mile by half mile region, before fitting this to the view.
#define METERS_PER_MILE 1609.344
Add the following line to the WAI_MapVC.h header file, compile the code and test.
So far we have demonstrated how to show the user’s current position on a map, and use that same position to determine a geographical region on the map. The next stage is to demonstrate how to place annotations on a map, and create a modal view which will be used to request data from the user prior to creating entries in a plist file.
Walkthrough - Step 4: Create and present a modal View to get data from the user
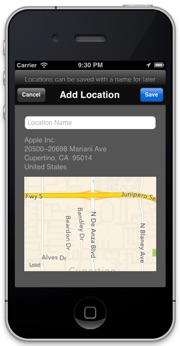
In this step, you will develop a new modal view controller to manage locations which are to be saved. We will implement an add button that in turn will present the new view controller modally, and when dismissed will either save the position or cancel the save.
#import <UIKit/UIKit.h>
#import <MapKit/MapKit.h>
#import <CoreLocation/CoreLocation.h>
#define METERS_PER_MILE 1609.344
@interface WAI_LocationDetailVC : UIViewController <UITextFieldDelegate>
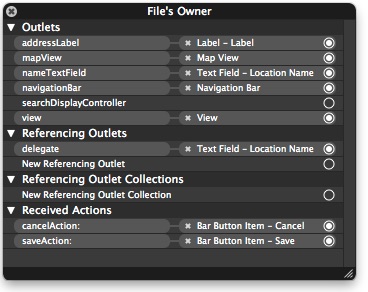
@property (strong, nonatomic) IBOutlet UITextField *nameTextField;
@property (strong, nonatomic) IBOutlet UILabel *addressLabel;
@property (strong, nonatomic) IBOutlet MKMapView *mapView;
@property (strong, nonatomic) IBOutlet UINavigationBar *navigationBar;
- (IBAction)saveAction:(id)sender;
- (IBAction)cancelAction:(id)sender;
@property (strong, nonatomic) CLLocation *location;
@end
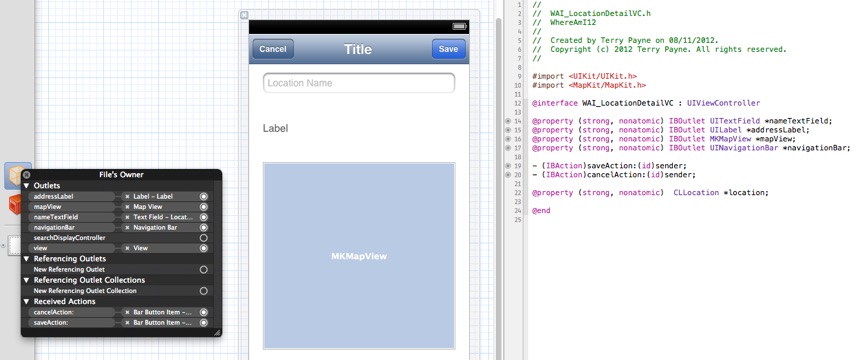
As we are using a MKMapView, we need to import the MapKit header file. We will also need the CoreLocation header file, as we will be using the reverse Geocoder methods to turn the location into an address. In addition, we have two IBActions for each of the to menu bar buttons. We are also going to be using a UITextField to gather data from the user. These UI elements will require a delegate to manage the keyboard; whilst we will discuss this later, ensure that the WAI_LocationDetailVC class adhere’s to the UITextFieldDelegate protocol (see the header fragment given below). We also will be passing in a location into this view controller, which will be presented on a map, and the user will be asked for additional information about the location. Therefore we need to provide a property that is public so that the parent (that presents the view controller modally) can pass the location to the child.
Note that in this xib/nib file, we have included a Navigation Bar, which contains two Bar Button Items - Cancel and Done. When a UINavigationController is used, it automatically creates a UINavigationBar. However, in this case we want a navigation bar and the ability to have navigation bar items as buttons, but are not interested in the UINavigationController support, Therefore we have to managed the bar ourselves. Also include the METERS_PER_MILE macro (it would be better if this were only defined in a single file), and ensure that the interface elements are connected to the properties.
As this new view will act as a modal view, we also need to define a protocol to determine what methods should be implemented by the parent view controller. In this case, we simply want to have a “dismiss” method. The convention and best practice approach when defining delegate protocols for a class is simply to use the name “classnamedelegate”, so add the following protocol definition after the end of the @interface...@end block in the WAI_LocationDetailVC.h header file:
@protocol WAI_LocationDetailVCDelegate
- (void) newLocationEntryComplete:(WAI_LocationDetailVC *)controller wasCancelled:(BOOL)cancelled;
@end
Note that this protocol block defines a single method, newLocationEntryComplete:wasCancelled:, which will be called when the modal (child) view controller (WAI_LocationDetailVC) asks the parent view controller (WAI_MapVC) to be dismissed. As the aim of the modal view is to elicit information about a location and give the user the option of saving the data or canceling, we also need a boolean flag (cancelled) to say whether or not we want to keep the data. Finally, we pass as an argument a reference to the child view controller (controller) as a convenience.
Now we have the protocol, we need a delegate property to store the delegate (which will be set to the parent view controller by the parent), and we need to state that this view controller will adhere to the new protocol. As all of this will appear before the definition of the protocol, we need a forward class definition. The first part of the header file is given below, to illustrate what is needed.
#import <UIKit/UIKit.h>
#import <MapKit/MapKit.h>
#import <CoreLocation/CoreLocation.h>
#define METERS_PER_MILE 1609.344
@protocol WAI_LocationDetailVCDelegate;
@interface WAI_LocationDetailVC : UIViewController <UITextFieldDelegate>
...
@property (strong, nonatomic) id <WAI_LocationDetailVCDelegate> delegate;
@property (strong, nonatomic) CLLocation *location;
...
Before we can test this class, we will need a way of allowing the user to dismiss the modal view controller, either by canceling the view controller, or by saving the results. Create the following two IBAction methods within the header file, and implement the corresponding methods within the corresponding implementation file. In both cases, call the newLocationEntryComplete:wasCancelled: method on the delegate, passing in self as the controller, and either YES or NO, depending on whether the done or cancel buttons were pressed. Ensure that these actions are linked to the two Bar Button Items - Cancel and Done in the nib file.
- (IBAction)saveAction:(id)sender {
[[self delegate] newLocationEntryComplete:self wasCancelled:NO];
}
- (IBAction)cancelAction:(id)sender {
[[self delegate] newLocationEntryComplete:self wasCancelled:YES];
}
Next, we need a way of getting the parent to present the modal view controller, and dismissing it afterwards. Open the parent class (WAI_MapVC) header file, import the WAI_LocationDetailVC header file, add the NewLocationEntryViewControllerDelegate protocol to the class interface, and add the protocol method definition (newLocationEntryComplete:wasCancelled:) to the header file. Also add an addLocation method definition as this will be the method used to present the modal view.
// WAI_MapVC.h
#import <UIKit/UIKit.h>
#import <MapKit/MapKit.h>
#import <CoreLocation/CoreLocation.h>
#import "WAI_LocationDetailVC.h"
#define METERS_PER_MILE 1609.344
@interface WAI_MapVC : UIViewController <CLLocationManagerDelegate,WAI_LocationDetailVCDelegate>
...
// =================================================
#pragma mark - Delegate Methods
- (void) newLocationEntryComplete:(WAI_LocationDetailVC *)controller wasCancelled:(BOOL)cancelled {
NSLog(@"The %@ button was pressed", (cancelled==NO?@"Done":@"Cancel"));
[self dismissViewControllerAnimated:YES completion:nil];
}
// =================================================
- (IBAction)addAction:(id)sender {
WAI_LocationDetailVC *myVC = [[WAI_LocationDetailVC alloc]
initWithNibName:@"WAI_LocationDetailVC" bundle:nil];
[myVC setModalTransitionStyle:UIModalTransitionStyleCoverVertical];
[myVC setDelegate:self];
// Create a fake location for testing purposes
CLLocation *testLoc = [[CLLocation alloc] initWithLatitude:37.330174 longitude:-122.032774];
[myVC setLocation:testLoc];
[self presentViewController:myVC animated:YES completion:nil];
}
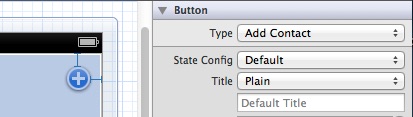
Compile the code, and check that it works. You should now see the “+” button appear near the top right corner of the Map tab. Clicking this button should present (modally) the child view, which can be cancelled or closed (using “Done” or “Save”). The map should also appear (although not scaled), and whilst we will have the labels and text fields on the view, they are not yet being used. However, if you look closely at the definition of the addLocation method (above) you will notice that we created a temporary CLLocation object to represent a location, and that this was passed to the modal view controller. We now want to do something with this.
Modify the viewDidLoad method to do the following:
-
1)Set the title in the UINavigation bar using the following line of code (note that when you run the app, the inclusion of the prompt will cause the navigationBar to grow, so you make have to go back to the xib file and move things down a bit):
[[[self navigationBar] topItem] setTitle:@"Add Location"];
[[[self navigationBar] topItem] setPrompt:@"Locations can be saved with a name for later"];
-
2)Scale the map accordingly to show the area around the location property. (If you are unclear to do this - take a look at the code you included in the locationManager:didUpdateToLocation:fromLocation: method of your WAI_MapVC class)
-
3)Reverse Geocode the address - see if you can understand what it does:
CLGeocoder *gcrev = [[CLGeocoder alloc] init];
[gcrev reverseGeocodeLocation:[self location] completionHandler:^(NSArray *placemarks, NSError *error) {
CLPlacemark* revMark = [placemarks objectAtIndex:0];
NSArray *addressLines = [[revMark addressDictionary] objectForKey:@"FormattedAddressLines"];
NSString *revAddress = [addressLines componentsJoinedByString:@"\n"];
[[self addressLabel] setText:revAddress];
// Add any code that also wants to utilise this address here in the geocoder block
}];
If you test and run, you will now notice that the street map of Cupertino now appears, and the current location may well appear, but we still don’t know the actual location of the location coordinate. For that, we need to create an annotation object that conforms to the MKAnnotation protocol.
Walkthrough - Step 5: Displaying an annotated point on the map
Annotations are objects that appear graphically on a map, and can be used to provide basic information about that annotation. Each annotation that appears is an instance of some object that adheres to MKAnnotation. Therefore, it must implement a coordinate property, but can also implement properties for title and subtitle. In this example, we will create a subclass of an NSObject, and implement these properties.
Create a new class (subclassed from NSObject), called WAI_LocationAnnotation. Modify its header file as follows:
#import <Foundation/Foundation.h>
#import <MapKit/MapKit.h>
@interface WAI_LocationAnnotation : NSObject <MKAnnotation>
@property (nonatomic, readonly, copy) NSString *title;
@property (nonatomic, readonly, copy) NSString *subtitle;
@property (nonatomic, readonly) CLLocationCoordinate2D coordinate;
- (id)initWithCoordinate:(CLLocationCoordinate2D)newCoordinate title:(NSString *)newTitle subtitle:(NSString *)newSubtitle;
@end
Note that in the above example, the coordinate type is CLLocationCoordinate2D and there are two strings - title and subtitle. As the protocol states that the three properties are all readonly and copied, we set these parameters in the property definitions. In addition, we have created our own convenience initialisation method initWithCoordinate:title:subtitle: to set the value of these properties. However, we want to be able to use the property setter methods privately within the class. To do this, we will also define a class extension, to ensure that privately the properties can be readwrite. Add the following to the WAI_LocationAnnotation.m implementation file:
#import "WAI_LocationAnnotation.h"
@interface WAI_LocationAnnotation ()
@property (nonatomic, readwrite, copy) NSString *title;
@property (nonatomic, readwrite, copy) NSString *subtitle;
@property (nonatomic, readwrite) CLLocationCoordinate2D coordinate;
@end
@implementation WAI_LocationAnnotation
- (id)initWithCoordinate:(CLLocationCoordinate2D)newCoordinate title:(NSString *)newTitle subtitle:(NSString *)newSubtitle {
if ((self = [super init])) {
[self setTitle:[newTitle copy]];
[self setSubtitle:[newSubtitle copy]];
[self setCoordinate:newCoordinate];
}
return self;
}
We are now ready to create annotations on our map. Annotations are added to a map by calling the method addAnnotation: on the MKMapView object (i.e. your map). Annotations can also be removed by calling the corresponding method removeAnnotation:. Likewise, an array of annotations can be retrieved from the MKMapView object using the method annotations method.
Create an annotation based on the current location, set a title, and subtitle within the viewDidLoad method of the WAI_LocationDetailVC class. Then add this to the map view. As the subtitle includes the reverse geocoded address, include this code within the geocode block; i.e.
[gcrev reverseGeocodeLocation:[self location] completionHandler:^(NSArray *placemarks, NSError *error) {
...
[[self addressLabel] setText:revAddress];
// Add any code that also wants to utilise this address here in the geocoder block
WAI_LocationAnnotation *annotation = [[WAI_LocationAnnotation alloc]
initWithCoordinate:[[self location] coordinate]
title:@"Save Location?"
subtitle:revAddress];
[[self mapView] addAnnotation:annotation];
}];
Compile and test.
Walkthrough - Step 6: Manage the Keyboard when the user is no longer using a UITextField.
The UITextFieldDelegate protocol defines the method textFieldShouldReturn: which is called when the Return button is pressed. By implementing this method in the delegate, the keyboard can be dismissed. Add the following method to your WAI_LocationDetailVC class:
- (BOOL)textFieldShouldReturn:(UITextField *)textField {
[textField resignFirstResponder];
return YES;
}
Finally, make sure that the WAI_LocationDetailVC class is the delegate of the UITextView. You can do this with the xib file, by right clicking on each of the text views, and connecting the delegate property to the File’s Owner. Compile the code, go to the modal view, and verify that when you type the Return key, that the keyboard disappears.
Walkthrough - Step 7: Storing the saved location persistently in a pList.
We will use an NSMutableArray to store all of the saved locations; these will be saved to a local (persistent) file on the device, and used to display known places in the “Locations” tab TableView. Add a new NSMutableArray property called myLocationEntityArray; this is the array we will be using to store the list. As we want to store the locations in a pList file within the App’s local directory, we will over-ride the getter method, and provide a “sync” method to update the file, to ensure that the plist files are used. In addition, we will construct and store the filename as a property, and use lazy evaluation to construct this as well. Add the following properties and methods to the WAI_MapVC.m source file:
@interface WAI_MapVC ()
@property (nonatomic, strong) CLLocationManager *locationManager;
@property (nonatomic, strong) NSMutableArray *locationArray;
@property (nonatomic, strong) NSString *locationsFileName;
@end
@implementation WAI_MapVC
// ==================================================================
// Lazy instantiation of location Array and filename
// ==================================================================
- (NSString *) locationsFileName {
if (_locationsFileName == nil) {
// Find the locations.plist file in the user's Documents Directory
NSArray *paths = NSSearchPathForDirectoriesInDomains (NSDocumentDirectory, NSUserDomainMask, YES);
NSString *documentsPath = [paths objectAtIndex:0];
// <Application Home>/Documents/locations.plist
_locationsFileName = [documentsPath stringByAppendingPathComponent:@"locations.plist"];
}
return _locationsFileName;
}
- (NSMutableArray *) locationArray {
if (_locationArray == nil) {
// Load the data into the Array
if((_locationArray = [[NSMutableArray alloc] initWithContentsOfFile:[self locationsFileName]]) == nil) {
// Failed to find file - probably doesn't exist. Just create an empty array
_locationArray = [[NSMutableArray alloc] init];
}
}
return _locationArray;
}
- (void) syncLocationArray {
[[self locationArray] writeToFile:[self locationsFileName] atomically:YES];
}
As there are a couple of new things going on here, it is worth providing some explanation. In locationsFileName, we use lazy evaluation to set the file name of the plist file the first time the getter is called. We want to store the file in the applications’ sandboxed file store, within the Documents Directory. We can request the path of this directory by using the C function NSSearchPathForDirectoriesInDomains, and specifying that we want to find the NSDocumentDirectory directory. We then simply append the file name to the path.
Plist files provide simple ways of representing arrays and dictionaries in an xml format. As such the methods initWithContentsOfFile: and writeToFile: can be used to load and save plist files directly from/to NSArrays and NSDictionaries.
Now we can store entries to a file, we can now construct array elements. Each location can be characterised by a latitude, longitude, and a location name (entered by the user). From these, we can then generate the address. The method newLocationEntryComplete:wasCancelled: is called by the modally presented method to say that the child is now finished and is to be dismissed. We can update this so that if the location is to be saved, we can retrieve the user-defined location name, and store the location in our array.
Modify the newLocationEntryComplete: wasCancelled: method to save the location, if the argument wasCancelled is false:
- (void) newLocationEntryComplete:(WAI_LocationDetailVC *)controller wasCancelled:(BOOL)cancelled {
NSLog(@"The %@ button was pressed", (cancelled==NO?@"Done":@"Cancel"));
if (cancelled == NO) {
// We want to create a new entry in our locations array
// each entry will be stored as a dictionary
// First retrieve the data from the child controller
NSString *locationName = [[controller nameTextField] text];
CLLocation *newLocation = [controller location];
// Create the entry. Note that we need to construct NSNumber objects for the latitude and longitude doubles.
NSDictionary *entryDict = @{@"label":locationName,
@"latitude":[NSNumber numberWithDouble:[newLocation coordinate].latitude],
@"longitude":[NSNumber numberWithDouble:[newLocation coordinate].longitude]};
// Finally, add the object to the array and synchronise (save) to the file
[[self locationArray] addObject:entryDict];
[self syncLocationArray];
}
[self dismissViewControllerAnimated:YES completion:nil];
}
Compile and test. You will notice, however, that every time we go to add our current location, we end up simply saving the location of some place in Cupertino, in California. This is because we hard-coded location coordinates within the method addAction:, prior to presenting the modal view. To overcome this, we want to use the location manager, and to query this whenever, we hit the “+” button. In addition, as we can use the locationManager to determine whether or not there are problems with obtaining the current location, we can both enable and disable the “+” button appropriately. Complete the following steps:
-
1)In the WAI_MapVC.h header file, create a new IBOutlet property called actionButton: of type UIButton, and link this to the “+” button in the xib file.
-
2)In viewDidLoad, add the following line to disable the button. We will enable it only when location events are detected:
[addButton setEnabled:NO];
-
3)To determine whether the user can add locations, we will use the fact that either a location has been detected (i.e. locationManager:didUpdateToLocation:fromLocation: is called) or that the location managed has failed (i.e. locationManager:didFailWithError: is called).
-
4)Add the following two delegate methods. Notice how they differ from their counterparts in NearestLocationViewController - in that method, we were displaying the location of newLocation and updating the map. In the code below, we don’t care about the location; but simply use the fact that locations are available to decide whether or not to enable the addButton.
- (void) locationManager:(CLLocationManager *)manager
didUpdateToLocation:(CLLocation *)newLocation
fromLocation:(CLLocation *)oldLocation {
[[self addButton] setEnabled:YES];
// Ensure that if we do something here, it is because we *are* in a different location
...
}
- (void) locationManager:(CLLocationManager *)manager didFailWithError:(NSError *)error {
// For now, do nothing other than report to the log
NSLog(@"Unable to get location events");
[[self addButton] setEnabled:NO];
}
-
5)Modify addLocation so that it gets the current location using the code fragment below, and passes this value to the to WAI_LocationDetailVC’s location property instead of creating the artificial location testLoc (in fact, remove this object from the code). Modify the code fragment so that the first thing the method does is to verify it has a location, as we do not want to create a new data point if we cannot get the current location.
- (IBAction)addAction:(id)sender {
// Get current location
CLLocation *location = [[self locationManager] location];
if (location == nil) {
return;
}
WAI_LocationDetailVC *myVC = [[WAI_LocationDetailVC alloc]
initWithNibName:@"WAI_LocationDetailVC" bundle:nil];
[myVC setModalTransitionStyle:UIModalTransitionStyleCoverVertical];
[myVC setDelegate:self];
[myVC setLocation:location];
[self presentViewController:myVC animated:YES completion:nil];
}
-
6)Finally, set the locationArray property to nil when the view disappears. This is because other view controllers (in particular the WAI_LocationsTableVC view controller in Step 8, below) may change the plist file. The viewWillDisappear: method should look like this:
- (void)viewWillDisappear:(BOOL)animated{
[super viewWillDisappear:animated];
NSLog(@"WAI_MapVC about to disappear");
[[self locationManager] stopUpdatingLocation];
[self setLocationArray:nil];
}
Compile the code and test. Initially, the add button should appear disabled, but shortly after, it will appear enabled. At this point, whenever you select this button, the current position should appear in the modal view, and can then be saved.
Walkthrough - Step 8: Listing the locations in the Locations View.
The one thing we have yet to do is to list the saved entries in the WAI_LocationsTableVC table. All we will do with this table is to load it when the view appears. appears, and then clear the table when the view disappears. In addition, the user can delete entries by “swiping” each tale cell to delete an entry. The design of this view controller is simple - all of the entries are stored in the plist file. When the view controller is displayed, the user will not be able to add new locations (this functionality is supported by the WAI_MapVC view controller), so there is no need to handle updates to the table, as long as it is loaded whenever the view appears.
In Step 7, we created the properties locationArray and locationFileName, and used lazy institution to set their value when they were needed. Implement these properties in WAI_LocationsTableVC.m and override the getter methods (by copying the code from WAI_MapVC) so that we can access the latest version of the locationsArray directly from the pList file. Include the syncLocationArray method, as we will allow users to delete locations from the table.
To display the locations, we will need to update that data source delegate methods in our table view controller.
-
1)Modify numberOfSectionsInTableView: to return 1, as we will only store one section in this table
-
2)Modify tableView:numberOfRowsInSection: to return the number of elements in the array locationArray.
-
3)Add the following lines to tableView:cellForRowAtIndexPath: to configure the cell:
UITableViewCell *cell = [tableView dequeueReusableCellWithIdentifier:CellIdentifier];
if (cell == nil) {
cell = [[UITableViewCell alloc] initWithStyle:UITableViewCellStyleSubtitle
reuseIdentifier:CellIdentifier];
}
// Configure the cell...
NSDictionary *entryDict = (NSDictionary *)[[self locationArray] objectAtIndex:[indexPath row]];
[[cell textLabel] setText:[entryDict objectForKey:@"label"]];
NSString *locStr = [NSString stringWithFormat:@"%.3f, %.3f",
[[entryDict objectForKey:@"latitude"] doubleValue],
[[entryDict objectForKey:@"longitude"] doubleValue]];
[[cell detailTextLabel] setText:locStr];
-
4)Ensure that the locationArray is always saved when the view disappears, and is reloaded and the table data reloaded when the view appear, by adding the following two methods:
- (void)viewWillAppear:(BOOL)animated{
[super viewWillAppear:animated];
[[self tableView] reloadData];
}

- (void)viewWillDisappear:(BOOL)animated{
[super viewWillDisappear:animated];
[self syncLocationArray];
[self setLocationArray:nil];
}
Compile and test. You should notice now that when you open the Locations tab, you will see each of the saved locations as cells in the table.
Walkthrough - Step 9: Deleting locations in the Locations View by enabling enabling swipe-to-delete
There is one small step that still needs to be done - that of allowing entries in the table to be deleted. In this step we will enable the “swipe-to-delete” functionality supported by the method tableView:commitEditingStyle:forRowAtIndexPath:. Uncomment this method, and take a look at its contents. For now, we are only considering the case where we delete an element (i.e. when the value of editingStyle is UITableViewCellEditingStyleDelete. The code in the method is responsible for deleting the row from the table view, and animating its deletion. However, you should also ensure that any change in this table view is reflected in your data source; i.e. the corresponding element should also be removed from your array. If not, the application will probably crash, due to a mismatch between the table’s understanding of the data model and the actual data model!
Start by removing the element from the locationArray by calling the method removeObjectAtIndex using the row in the index path as the argument. Then delete the row in the index path (see the code fragment below). Compile the code and then try deleting elements from the running application by wiping (from left to right) along one of the entries in the table view.
// Override to support editing the table view.
- (void)tableView:(UITableView *)tableView commitEditingStyle:(UITableViewCellEditingStyle)editingStyle
forRowAtIndexPath:(NSIndexPath *)indexPath
{
if (editingStyle == UITableViewCellEditingStyleDelete) {
// Remove the selected element from our array
[[self locationArray] removeObjectAtIndex:[indexPath row]];
[tableView deleteRowsAtIndexPaths:@[indexPath] withRowAnimation:UITableViewRowAnimationFade];
// Delete the row from the data source
[tableView deleteRowsAtIndexPaths:@[indexPath] withRowAnimation:UITableViewRowAnimationFade];
}
else if (editingStyle == UITableViewCellEditingStyleInsert) {
// Create a new instance of the appropriate class, insert it
// into the array, and add a new row to the table view
}
}
Compile the code, and try “swiping” a row to verify that it can be deleted.
Additional Task 1
In this app, there has been some sloppy duplication of code - in particular, the fact that both WAI_MapVC and WAI_LocationsTableVC use and implement getters for the same properties. Likewise, the stores locations are key’ed using strings that are specified inline. Go through the code, and see if these duplications can be eliminated, to leave the code cleaner and easier to maintain (Hint: consider creating a custom class to manage the data).
Additional Task 2
In the WAI_MapVC view controller, create a set of map annotations for each of the locations and make them appear on the map when the map view appears.
Additional Task 3
In the WAI_MapVC view controller, whenever the user changes location, the map re-centres itself around the user’s position. Change the code so that the map's position and scale are based on the user’s initial position (when the view appears), but then doesn’t update, allowing the user to pan and scale the map to explore the area. Consider adding an additional button to return the map to the user’s location.
Additional Task 3
In the WAI_LocationsTableVC view controller, we simply display a table. Embed this in a UINavigationController so that the table can have a title. Look inside viewDidLoad - uncomment the line that add’s the edit button to the navigation bar, and compile the code to see what happens.
Full Code
A zip file of the complete project is available from here: WhereAmI12.zip. Note that this doesn’t include the additional tasks.