2013/14
This lab introduces the notion of customizing cells within a Table View, both programmatically and using a xib/nib. It also demonstrates how navigation can be facilitated using a navigation View Controller by hand, and illustrates the restrictions of loading data onto the main thread. It also illustrates the use of JSON to load data when presented as dictionaries.
Whilst this builds upon the KingsQueens Lab, it can be done independently, and assumes no prior knowledge. There are some initial similarities, but also subtle differences, and both labs complement each other.
The lab comes in two parts - in the subsequent part, we will address the problem of loading data within the main thread by looking at the use of NSOperation and Operation Queues.
Lab 4 - KingsQueens Navigator Part A (13/14)
15/10/2013

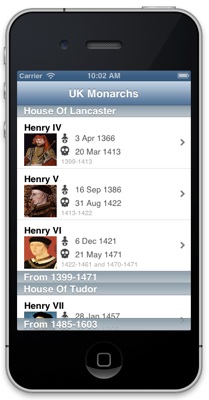
This tutorial introduces you to the notion of customising cells when displaying data within a table view, and obtaining data from an external JSON source. It involves the use of a new type of view controller container class known as a NavigationViewController, and using this with a TableViewController. It will also involve you gaining some additional experience in using NSDictionary and NSArray classes. The aim of the lab is to display elements within a table view, and use these to migrate to other views depending on the cell selected. Cell customisation will be done both programmatically, as well as using nib/xib files.
This lab extends the knowledge presented in the KingsQueens Lab, but assumes no prior knowledge. Thus, there may be some initial similarities, but also subtle differences, as both labs complement each other.
NOTE: although the full source is included at the bottom of the page, go through the lab itself, and avoid looking at the source. The object is not to get the lab working, but rather to understand how and why the code works!!!
Todays Tasks:
Walkthrough - Step 1: Creating the app and adding a new Table View Controller by hand.
Begin by creating an Empty Application application called KingsQueensNav12. Type in the name into the Product Name field, and add “KQ2_” to the Class Prefix (see opposite). Ensure that the device Family is set to iPhone, and that you are not using Core Data or Unit Testing. Use Automatic Reference Counting!
Take a look at the files in the project - you will notice that the app delegate source (src) and header file have been created, but there are no view controller or xib files. We will create a new view controller, by adding a new class to the project.
Create a new UIViewController subclass, and give it the name KQ2_MainViewController; before clicking Next, ensure that from the drop down menu, your new class is a subclass of UITableViewController, and that you untick the options for “Targeted for iPad” and “With XIB for user interface”. You will be creating the interface programmatically for this view controller,
In the app delegate source file, we now need to create an instance of the new KQ2_MainViewController class, calling the initWithStyle method as illustrated below, and set this as the root view controller. Because it will be retained by the window, we do not need to retain this ourselves in a property. Import the KQ2_MainViewController at the top of the app delegate, and update the method application:didFinishLaunchingWithOptions: to include the new view controller as follows:
- (BOOL)application:(UIApplication *)application didFinishLaunchingWithOptions:(NSDictionary *)launchOptions
{
self.window = [[UIWindow alloc] initWithFrame:[[UIScreen mainScreen] bounds]];
// ==========================================================
// Override point for customization after application launch.
KQ2_MainViewController *vc = [[KQ2_MainViewController alloc] initWithStyle:UITableViewStylePlain];
[[self window] setRootViewController:vc];
// ==========================================================
self.window.backgroundColor = [UIColor whiteColor];
[self.window makeKeyAndVisible];
return YES;
}
Note that we are not using the dot notation, even though it is used elsewhere in the template code. You will see references to self.window and [self window] in the code - these are actually the same. However, as the dot syntax is subtly different to that used in Java, try to avoid using it for now. Your whole application:didFinishLaunchingWithOptions: method should look something like the code above (note that I have added the comment lines around the code you have just added). It might vary if you are using an earlier version of XCode, but should still work.
The Data will be sourced from a JSON file, whose top level element is a dictionary. JSON is a simple file format that can present data as arrays, dictionaries, strings, ints etc. (see JSON.org for more details). The JSON NSJSONSerialization class (introduced in iOS5) converts JSON data to foundation objects (such as NSString, NSNumber, NSArray or NSDictionary), and foundation objects to JSON data. Top level objects are either NSArrays or NSDictionaries, depending on the JSON structure. In the KingsQueens Lab, a the two JSON files each consisted of an array of objects; thus the object returned when calling JSONObjectWithData was an NSArray. In this case, we will be parsing a JSON file consisting of a dictionary object; this the object returned when calling JSONObjectWithData will be an NSDictionary. Take a look at the two JSON files, and see how they differ (hint - an array is represented by the character “[“, whereas a dictionary uses a”{“).
JSON file containing an array of objects:
http://www.csc.liv.ac.uk/people/trp/Teaching_Resources/COMP327/Monarchs2.json
JSON file containing a dictionary of objects:
http://www.csc.liv.ac.uk/people/trp/Teaching_Resources/COMP327/Monarchs6.json
The data will be stored within the property myKingsQueensDataModel. However, instead of explicitly calling a method to load the data, we will overload the property method myKingsQueesDataModel to load the data if it has not been loaded. This is known as lazy instantiation.
Create the property myKingsQueensDataModel within the KQ2_MainViewController source file:
static NSString *myJSONDataSrc = @"http://www.csc.liv.ac.uk/people/trp/Teaching_Resources/COMP327/Monarchs6.json";
@interface KQ2_MainViewController ()
@property (strong, nonatomic) NSDictionary *myKingsQueensDataModel;
@end
Note that unlike in the KingsQueens Lab, this is an object of type NSDictionary. As we assume that we use Xcode4.5, we will not synthesize the property. However, if you are using an earlier version of Xcode (pre Xcode 4.5), then follow the convention of synthesizing the property to use underscore as the prefix to the iVar name; i.e.:
@synthesize myKingsQueensDataModel = _myKingsQueensDataModel; // only for early versions of Xcode pre 4.5
In addition, we have created a static string in our source file to contain the URL string - this makes it easy to find if we ever want to change it. It is better coding practice to include such constants somewhere easy to find (e.g. at the top of the source file as a static NSString) rather than being buried inside the code.
We now can overload the method myKingsQueesDataModel by defining it ourselves. Take a look at the following implementation; it initially checks the corresponding instance variable _myKingsQueesDataModel directly, to see if it has been given a value (i.e. non nil), and if not, it loads the JSON data to assign it a value. By convention, properties will be initialized with the value nil. It is still possible to change the value of _myKingsQueesDataModel by using the setter method setMyKingsQueesDataModel explicitly, but the advantage of using this approach is that the instance variable is not initialised until it is actually needed (hence lazy!), and if it is never needed, then the data will never be created!
// ==================================================================
// Lazy instantiation
// ==================================================================
- (NSDictionary *) myKingsQueensDataModel {
if (_myKingsQueensDataModel == nil) {
// Calling the getter method for the first time, so we need to load the data.
NSLog(@"Calling accessor method myKingsQueensDataModel for the first time...");
// Generate the URL request for the JSON data
NSURL *url = [NSURL URLWithString:myJSONDataSrc];
// Get the contents of the URL
NSData *data = [NSData dataWithContentsOfURL:url];
NSError *error;
// Note that we are not calling the setter method here... as this would be recursive!!!
_myKingsQueensDataModel = [NSJSONSerialization JSONObjectWithData:data options:kNilOptions error:&error];
}
return _myKingsQueensDataModel;
}
Now we have a way of obtaining the data, we can fill in the table. As we are using a dictionary, we will need to explicitly pull out objects from the dictionary based on the keys. To do this, we will also use a lazy evaluation approach to create this array. Construct the property monarchHouseKeys (as an NSArray), and overload the accessor method monarchHouseKeys as follows:
- (NSArray *) monarchHouseKeys {
if (_monarchHouseKeys == nil) {
// Note, we create a mutable array to temporarily store the keys, then
// copy this into the immutable iVar array _monarchHouseKeys
NSString *keyStr;
NSMutableArray *tmpArr = [[NSMutableArray alloc] init];
for (keyStr in [self myKingsQueensDataModel]) {
[tmpArr addObject:keyStr];
}
_monarchHouseKeys = [NSArray arrayWithArray:tmpArr];
}
return _monarchHouseKeys;
}
Finally, we can implement the table data source methods. This will involve extracting data from the data structure, which is a mixture of arrays and dictionaries!!! We will construct a number of sections, where each section contains the monarchs within a house. As we have already extracted the keys from the top level dictionary and stored them within the array monarchHouseKeys, we can simply return this number:
- (NSInteger)numberOfSectionsInTableView:(UITableView *)tableView
{
// Return the number of sections.
return [[self monarchHouseKeys] count];
}
Calculating the number of elements is a little trickier, as we first need to extract the house object from the original data structure (based on the corresponding key found in the monarchHouseKeys array for that section), and then extract the monarchs array from this house object.
- (NSInteger)tableView:(UITableView *)tableView numberOfRowsInSection:(NSInteger)section
{
// Return the number of rows in the section.
NSString *key = [[self monarchHouseKeys] objectAtIndex:section];
NSDictionary *houseObject = [[self myKingsQueensDataModel] objectForKey:key];
NSArray *monarchsArray = [houseObject objectForKey:MONARCHS];
return [monarchsArray count];
}
Note: once you have updated these two methods, you should remove the line “#warning Incomplete method implementation” from each, to avoid generating the compiler warnings.
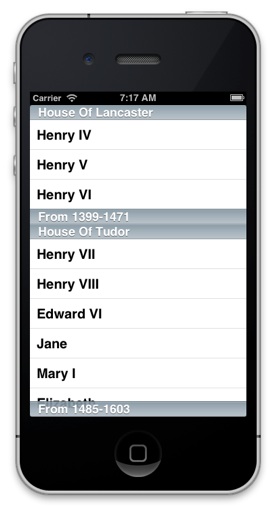
Finally, you need to determine what data should appear in each cell of the table. This is done in the tableView:cellForRowAtIndexPath: method. This method is called each time the view constructs a new cell to include in the table. For the moment, we simply want to define the text that should appear in the cell.
There are two methods used to check to see if cells can be dequeued, prior to use. The new method dequeueReusableCellWithIdentifier:forIndexPath: was introduced in iOS6, and will appear in your boilerplate code of KQ2_MainViewController. However, this method requires that you create a custom cell class, and register its nib file. We will look at this later; however, for now, we want to replace the call with dequeueReusableCellWithIdentifier: (note it only takes a single argument) which will return nil if no dequeued cell, in which case we need to alloc a cell ourselves:
- (UITableViewCell *)tableView:(UITableView *)tableView cellForRowAtIndexPath:(NSIndexPath *)indexPath
{
static NSString *CellIdentifier = @"Cell";
UITableViewCell *cell = [tableView dequeueReusableCellWithIdentifier:CellIdentifier];
if (cell == nil) {
cell = [[UITableViewCell alloc] initWithStyle:UITableViewCellStyleDefault reuseIdentifier:CellIdentifier];
}
// Configure the cell...
NSString *key = [[self monarchHouseKeys] objectAtIndex:[indexPath section]];
NSDictionary *monarchDict = [[self myKingsQueensDataModel] objectForKey:key];
NSArray *monarchs = [monarchDict objectForKey:MONARCHS];
[[cell textLabel] setText:[[monarchs objectAtIndex:[indexPath row]] objectForKey:NAME]];
return cell;
}
Note, that you will see two errors for NAME and MONARCHS. Add the following C Macro constants after the #import in the source file, but before declaring the interface. Use this approach to avoid adding strings for the dictionary keys within your code - this will make the code more manageable when updating in future.
#define MONARCHS @"monarchs"
#define NAME @"name"
Compile the code and check that the application works.
Additional Task 1.1
Try augmenting your code by adding the name of the House as a section header, and the Epoch as the section footer. Extract this data from the monarch dictionary in a similar way to constructing the cell. Look at the KingsQueens Lab, to see how to construct section headers and footers.
Walkthrough - Step 2: Customizing a cell programmatically

TableViews are highly configurable, but sometimes it is desirable to modify the rows, or cells, to change the way content is displayed, or to add new content. As we saw in the KingsQueens Lab, there are various different UITableViewCell styles. Whilst these cells are sufficient for most applications, it is possible to customise these styles by adding subviews to the content view of the cell programmatically, or create and load custom table-view cells from nib files. The following two steps demonstrate how to do this.
The first approach involves creating new subviews; in this case we will create two new labels, and add two images next to these labels. The content view of the cell can be obtained by calling [cell contentView]; views created programmatically can then be added to this view.
Start by declaring two UILabels and two UIImages in the method tableView:cellForRowAtIndexPath:, for the birth and death labels (for each monarch) and for the images that will be used to represent these two.
The labels and image views then need to be created. As cells are typically reused, these views need only be created when the cells are initialised, not every time that they are used. Start by creating the view programmatically; note that we create a CGRect that describes the size and location of the label (i.e. origin = (170, 5) and its size is 80 wide and 15 high). The font is set (as a smaller font is required for our custom cell), and we then set a tag (we’ll return to this later). Finally, the cell is attached as a subview to the cell’s content view.
birthLabel = [[UILabel alloc]
initWithFrame:CGRectMake(170.0, 5.0, 80.0, 15.0)];
[birthLabel setFont:[UIFont systemFontOfSize:11.0]];
[birthLabel setTag:BIRTHLABEL_TAG];
[[cell contentView] addSubview:birthLabel];
When a cell is reused, the attached views are also reused. However, this means that there needs to be some means of accessing the view from within the cell, so that its value can be changed. A tag is an identifier of a view, and can be used to extract a view from the view hierarchy by using the method viewWithTag:. This is why a tag label (for example BIRTHLABEL_TAG in the code above). Therefore, to get this label when reusing a cell, we can simply retrieve it as follows:
birthLabel = (UILabel *)[[cell contentView] viewWithTag:BIRTHLABEL_TAG];
Note that the tags should actually be integers - typically #define macros are used to define these tags. All that remains is to set the value of each of the new custom views.
In the KQ2_MainViewController header file, add the following macros:
#define BIRTHLABEL_TAG 1
#define DEATHLABEL_TAG 2
#define BIRTHIMAGE_TAG 3
#define DEATHIMAGE_TAG 4
Also add the following three macros to your source file:
#define BORN @"born"
#define DIED @"died"
#define REIGNED @"reigned"
It is actually personal style as to whether these C macros appear in the header or source file - essentially if another class may need access to these macros, then put them in the header file. If they are private to the class, then put them in the source file.
Replace the method tableView:cellForRowAtIndexPath: in the KQ2_MainViewController src file with the following code:
- (UITableViewCell *)tableView:(UITableView *)tableView cellForRowAtIndexPath:(NSIndexPath *)indexPath
{
static NSString *CellIdentifier = @"MonarchCell";
UILabel *birthLabel, *deathLabel;
UIImageView *birthImage, *deathImage;
UITableViewCell *cell = [tableView dequeueReusableCellWithIdentifier:CellIdentifier];
if (cell == nil) {
cell = [[UITableViewCell alloc] initWithStyle:UITableViewCellStyleSubtitle
reuseIdentifier:CellIdentifier];
birthLabel = [[UILabel alloc]
initWithFrame:CGRectMake(220.0, 5.0, 80.0, 15.0)];
[birthLabel setFont:[UIFont systemFontOfSize:11.0]];
[birthLabel setTag:BIRTHLABEL_TAG];
[[cell contentView] addSubview:birthLabel];
deathLabel = [[UILabel alloc]
initWithFrame:CGRectMake(220.0, 25.0, 80.0, 15.0)];
[deathLabel setFont:[UIFont systemFontOfSize:11.0]];
[deathLabel setTag:DEATHLABEL_TAG];
[[cell contentView] addSubview:deathLabel];
birthImage = [[UIImageView alloc]
initWithFrame:CGRectMake(200.0, 5.0, 13.0, 19.0)];
[birthImage setTag:BIRTHIMAGE_TAG];
[[cell contentView] addSubview:birthImage];
deathImage = [[UIImageView alloc]
initWithFrame:CGRectMake(200.0, 25.0, 14.0, 13.0)];
[deathImage setTag:DEATHIMAGE_TAG];
[[cell contentView] addSubview:deathImage];
} else {
birthLabel = (UILabel *)[[cell contentView] viewWithTag:BIRTHLABEL_TAG];
deathLabel = (UILabel *)[[cell contentView] viewWithTag:DEATHLABEL_TAG];
birthImage = (UIImageView *)[[cell contentView] viewWithTag:BIRTHIMAGE_TAG];
deathImage = (UIImageView *)[[cell contentView] viewWithTag:DEATHIMAGE_TAG];
}
// Configure the cell...
// Unpack the data structure
NSString *key = [[self monarchHouseKeys] objectAtIndex:[indexPath section]];
NSDictionary *monarchDict = [[self myKingsQueensDataModel] objectForKey:key];
NSArray *monarchs = [monarchDict objectForKey:MONARCHS];
// Set the main label text details
[[cell textLabel] setText:[[monarchs objectAtIndex:[indexPath row]] objectForKey:NAME]];
[[cell detailTextLabel] setText:[[monarchs objectAtIndex:[indexPath row]] objectForKey:REIGNED]];
// set the details for the birth and death lables/images
[birthLabel setText:[[monarchs objectAtIndex:[indexPath row]] objectForKey:BORN]];
[deathLabel setText:[[monarchs objectAtIndex:[indexPath row]] objectForKey:DIED]];
NSString *birthImagePath = [[NSBundle mainBundle] pathForResource:@"76-baby" ofType:@"png"];
UIImage *theBirthImage = [UIImage imageWithContentsOfFile:birthImagePath];
[birthImage setImage:theBirthImage];
NSString *deathImagePath = [[NSBundle mainBundle] pathForResource:@"21-skull" ofType:@"png"];
UIImage *theDeathImage = [UIImage imageWithContentsOfFile:deathImagePath];
[deathImage setImage:theDeathImage];
return cell;
}
before compiling, you will need the images used. These two images have been taken from the royalty free Glyphish set of mobile app icons, which is a good repository for button and tab-bar icons. In particular, you will need the following two files:
_files/76-baby.png)
_files/21-skull.png)
Add these to your project and compile. Take a closer look at the code above to be sure you understand what it does.
Additional Task 2.1
Modify the method tableView:cellForRowAtIndexPath: so that it loads and displays the thumbnail image into the cell. You will notice how this can slow the application down - when first displaying each cell, and then when loading a new image. We will soon look at how this data could be cached, and how making use of multithreading can be used to load the images without affecting the application performance. Use the following code fragment:
// Display thumb images
NSURL *url = [NSURL URLWithString:[[monarchs objectAtIndex:[indexPath row]] objectForKey:@"thumb"]];
UIImage *thumbImage = [UIImage imageWithData:[NSData dataWithContentsOfURL:url]];
[[cell imageView] setImage:thumbImage];
Walkthrough - Step 3: Customizing a cell by registering a xib/nib file
Creating cells using xib files can often be far more convenient and flexible than customizing cells programmatically. Prior to iOS 6, this would typically involve creating a xib file that contained a UITableViewCell, and then explicitly loading the nib to a pre-defined property, only to then rely on tags to access the views in the cell’s view hierarchy. Post iOS6, this has been simplified, thanks to the inclusion of a couple of new methods.
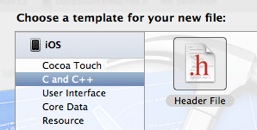
Start by creating a new file, called KQ2_CustomCell, which is a subclass of a UITableViewCell. In the header file, create three outlet properties corresponding to the UILabels you are about to add to your cell. In addition, it is a good idea to specify here the identifier of the cell for later use, such as using a #define macro:
#import <UIKit/UIKit.h>
#define CUSTOM_CELL_REUSE_IDENTIFIER @"MonarchCell"
@interface KQ2_CustomCell : UITableViewCell
@property (weak, nonatomic) IBOutlet UILabel *nameLabel;
@property (weak, nonatomic) IBOutlet UILabel *reignedLabel;
@property (weak, nonatomic) IBOutlet UILabel *birthLabel;
@property (weak, nonatomic) IBOutlet UILabel *deathLabel;
@property (weak, nonatomic) IBOutlet UIImageView *thumbImageView;
@end
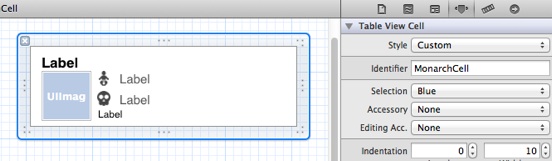
Go to the Objects list in the right hand menu (i.e. where you normally find view objects such as labels etc), and scroll until you find a Table View Cell. Drag one of these onto the main screen - once done, you should see the cell, and a view corresponding to this cell will appear under the First Responder icon. This is the cell we will modify.
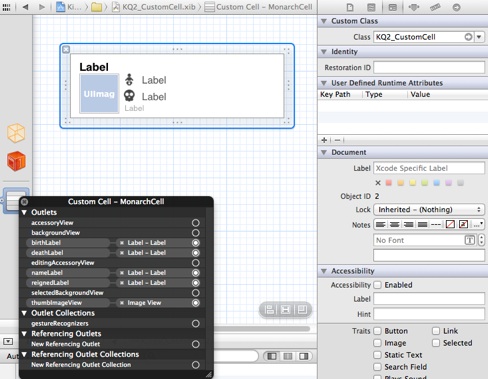
Next, we need to identify the cell’s class. Select the cell, and in the Identity Inspector, change the Class to KQ2_CustomCell. Finally, connect the cell’s outlet properties to the UILabels and the UIImageView.
Important: right click the Custom Cell icon on the left of the editor (under the File’s Owner and First Responder), and link the outlets listed here. If you choose the outlets in the File’s Owner, then you will encounter errors later!
The method dequeueReusableCellWithIdentifier:forIndexPath: in iOS6 allows a custom cell (and its NIB file) to be registered with the Reuse Queue of the table. Once registered, whenever a request to dequeue a reusable cell is made (as opposed to using dequeueReusableCellWithIdentifier: which was used earlier), if no existing cell is available, then one will automatically be loaded from the nib file. Open the KQ2_MainViewController.m source file and import the new custom file header. Then add the following code fragment to the end of the method viewDidLoad
UINib *monarchCellNib = [UINib nibWithNibName:@"KQ2_CustomCell" bundle:nil];
[[self tableView] registerNib:monarchCellNib forCellReuseIdentifier:CUSTOM_CELL_REUSE_IDENTIFIER];
Before we can test the code, we now have to modify the method tableView:cellForRowAtIndexPath: in the KQ2_CustomCell src file with the following code:
- (UITableViewCell *)tableView:(UITableView *)tableView cellForRowAtIndexPath:(NSIndexPath *)indexPath {
KQ2_CustomCell *cell = [tableView dequeueReusableCellWithIdentifier:CUSTOM_CELL_REUSE_IDENTIFIER forIndexPath:indexPath];
// Configure the cell...
// Unpack the data structure
NSString *key = [[self monarchHouseKeys] objectAtIndex:[indexPath section]];
NSDictionary *monarchDict = [[self myKingsQueensDataModel] objectForKey:key];
NSArray *monarchs = [monarchDict objectForKey:MONARCHS];
// Set the main label text details
[[cell nameLabel] setText:[[monarchs objectAtIndex:[indexPath row]] objectForKey:NAME]];
[[cell reignedLabel] setText:[[monarchs objectAtIndex:[indexPath row]] objectForKey:REIGNED]];
// Display thumb images
NSURL *url = [NSURL URLWithString:[[monarchs objectAtIndex:[indexPath row]] objectForKey:@"thumb"]];
UIImage *thumbImage = [UIImage imageWithData:[NSData dataWithContentsOfURL:url]];
[[cell thumbImageView] setImage:thumbImage];
// set the details for the birth and death lables/images
[[cell birthLabel] setText:[[monarchs objectAtIndex:[indexPath row]] objectForKey:BORN]];
[[cell deathLabel ] setText:[[monarchs objectAtIndex:[indexPath row]] objectForKey:DIED]];
return cell;
}
// Calculate the height of the cells
// As the nib has already been loaded through the creation of monarchCellNib
// we can simply pull out the cell from that and then calculate its bounds.
// The following code fragment "does the right thing" by checking that the only
// object we consider is of type KQ2_CustomCell
NSArray *nibArray = [monarchCellNib instantiateWithOwner:nil options:nil];
KQ2_CustomCell *cell;
for (id currentObject in nibArray) {
if ([currentObject isKindOfClass:[KQ2_CustomCell class]]) {
cell = (KQ2_CustomCell *) currentObject;
break;
}
}
if (cell) {
CGRect cellRect = [cell bounds];
[[self tableView] setRowHeight:cellRect.size.height];
}
Although this is a clean way of doing this, the introduction of dequeueReusableCellWithIdentifier:forIndexPath: means that we could simply call it to return a cell, instead, and use this. Compile the code and check it works. Take a closer look at the code above to be sure you understand what it does.
Additional Task 3.1
Modify the method viewDidLoad so that it uses dequeueReusableCellWithIdentifier:forIndexPath: to obtain a cell, instead of instantiating the cell using instantiateWithOwner:options:
Walkthrough - Step 4: Navigating between views using a UINavigationController
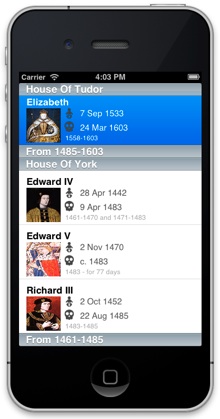
The final step is to allow the user to select one of the monarchs, and to illustrate how to use the UINavigationController to manage the transition from the KQ2_MainViewController to a view controller that provides additional detail about each monarch, depending on the cell selected.
In this step we will be creating a xib file for the pre-Xcode 4 phones (i.e. a vanilla iPhone with a 3.5 inch screen). It is also possible to design applications that exploit the iPhone 4’s larger 4 inch display; but that is not covered here. In addition, the view will appear on a screen managed by a UINavigationController, which will add its own navigation bar to the top of the screen. This is where each view’s title goes, and where the back button will appear (if more than one view controller is on the navigator’s stack). The view owned by the topmost view will then appear below this.
Fortunately, the Interface Builder tool can resize views to account for the fact that they might appear with a Navigation Bar (or Tab bar, if a UITabBarController is used).
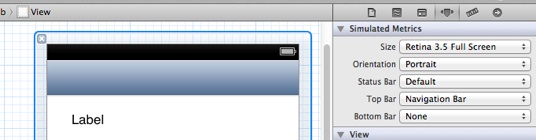
Start by creating a new UIViewController with a xib file, called KQ2_DetailViewController, and open the KQ2_DetailViewController.xib file. Select the main view, and then look at the Attribute’s Inspector. The first set of options will be listed under the title “Simulated Metrics”. These simulate changes to the devices window without adding elements to the view of nib file. Under Size - set the display to be “Retina 3.5 Full Screen”; this should ensure that the view will fit on the iPhone’s display. Notice that the status bar appears even though the xib file only contains a view? This is because it is being simulated for the sake of layout. We also want to do something similar to simulate the use of a UINavigationController. Change the “Top Bar” setting to “Navigation Bar”, to simulate the effect of viewing the view within a UINavigationController - you will see the Navigation bar appear at the top of the screen. Try adding a label to the view and watch how it moves down when you chance the top bar simulation.
Note that this is not the same as adding a navigation bar to the view - nothing is added to the nib file!!!
Within the KQ2_DetailViewController.xib file, add a number of UILabels for: birth, death, epoch, house, name, reigned; and add a single UIImageView called portraitImageView (see illustration below). Modify any of the presentation parameters as you like (i.e. font colour, position etc). Update the KQ2_DetailViewController.h header file to define UILabels and the UIImageView as properties:
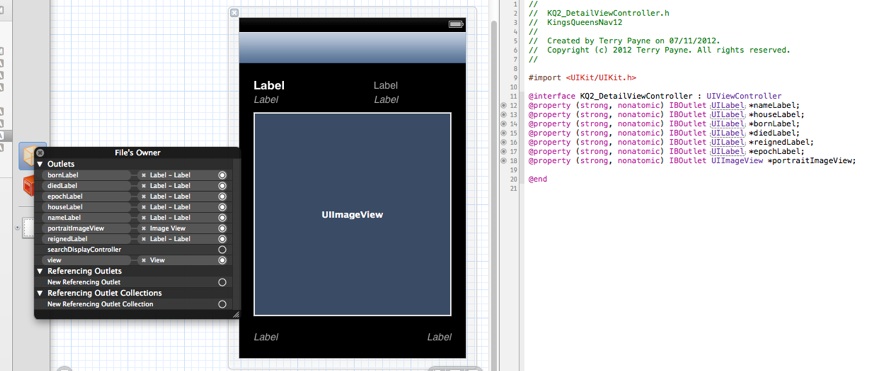
To display information in this view, we will exploit two dictionaries; the first corresponding to the monarch themselves, and a second which will be temporarily created to pass through details of the house (without providing all the house monarchs as well). Add two additional properties to the KQ2_DetailViewController.h header file:
@property (strong, nonatomic) NSDictionary *monarchDetails;
@property (strong, nonatomic) NSDictionary *houseDetails;
We now have to generate the values of each object, given the data in the two dictionaries. For now, assume that monarchDetails contains only a number of strings pertaining to a single monarch, and that houseDetails has only two vey-value pairs corresponding to the house title and house epoch. We will set these values by modifying the viewDidLoad method within KQ2_DetailViewController.m. Add the following four code fragments:
...
// Here we simply insert the strings from the monarchDetails dictionary
[[self nameLabel] setText:[[self monarchDetails] objectForKey:NAME]];
[[self reignedLabel] setText:[[self monarchDetails ] objectForKey:REIGNED]];
...
The above fragment simply updates the labels with strings from the monarchDetails dictionary.
...
// Here we do some additional formatting on the strings
[[self bornLabel] setText:[NSString stringWithFormat:@"Born: %@", [[self monarchDetails] objectForKey:BORN]]];
[[self diedLabel] setText:[NSString stringWithFormat:@"Died: %@", [[self monarchDetails] objectForKey:DIED]]];
...
In this case, we want to precede the strings with either “Born:” or “Died:”. To do this, we create two temporary strings (these will be autorelease because they are generated using the class factory method stringWithFormat:), which include the additional strings from the monarchDetails dictionary.
...
// Here we insert the strings from the houseDetails dictionary
[[self houseLabel] setText:[[self houseDetails] objectForKey:HOUSETITLE]];
[[self epochLabel] setText:[[self houseDetails] objectForKey:HOUSEEPOCH]];
...
The above fragment simply updates the labels with strings from the houseDetails dictionary.
...
// Here we obtain the image from the internet (on the main thread!!!)
NSURL *url = [NSURL URLWithString:[[self monarchDetails] objectForKey:IMAGE]];
UIImage *portraitImage = [UIImage imageWithData:[NSData dataWithContentsOfURL:url]];
[[self portraitImageView] setImage:portraitImage];
// Ensure the aspect ratio is maintained
[[self portraitImageView] setContentMode:UIViewContentModeScaleAspectFit];
...
Here, we extract the main image URL from the monarchDetails dictionary, and use this to retrieve an image as NSData, before converting it into a UIImage. The image is then inserted into the portraitImageView image view, and the scaling is set to preserve the aspect ratio of the original image.
...
// Set the Monarch's name as the View title; this will appear in the navigation var
[self setTitle:[[self monarchDetails] objectForKey:NAME]];
The final fragment sets the title of the view.
#define TITLE @"title"
#define MONARCHS @"monarchs"
#define EPOCH @"epoch"
#define NAME @"name"
#define REIGNED @"reigned"
#define BORN @"born"
#define DIED @"died"
#define IMAGE @"image"
#define HOUSETITLE @"title"
#define HOUSEEPOCH @"epoch"
#define IMAGE @"image"
Include this file in both KQ2_MainViewController.m and KQ2_DetailViewController.m, but delete the old macro entries from KQ2_MainViewController.m
Before we can make use of this view controller, there are still three more tasks that need to be taken care of:
-
1)Make the application’s root view controller a UINavigationController
-
2)Add a disclosure indicator to the cell, to inform the user that selecting a cell will potentially transition to another view
-
3)Push the new view controller onto the stack when a cell is selected
Open up the app delegate, and update the method application:didFinishLaunchingWithOptions:t so that vc is used as the UINavigationController’s root view controller, and the UINavigationController itself becomes the application’s root view controller.
// ==========================================================
// Override point for customization after application launch.
KQ2_MainViewController *vc = [[KQ2_MainViewController alloc] initWithStyle:UITableViewStylePlain];
UINavigationController *navVC = [[UINavigationController alloc] initWithRootViewController:vc];
[[self window] setRootViewController:navVC];
// ==========================================================
If you then compile the code, you will notice that a navigation bar appears, but with no title. Go to the viewDidLoad method in KQ2_MainViewController.m, and add the following line to set the view’s title:
[self setTitle:@"UK Monarchs"];
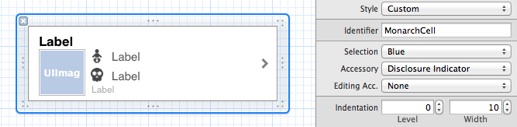
Go to the KQ2_CustomCell.xib file, and change the settings of the table view cell so that it’s accessory setting us set to “Disclosure Indicator”. Remember, this doesn’t change the behaviour of the cells in any way (it is just a property, and could also be set within the code itself). However, it is important to give the user the visual cue that by selecting this cell, there will be a transition.
The final stage involves the creation of an instance of this view controller (in response to the selection of a cell in the main view) providing it with the two dictionaries, and then pushing the view onto the Navigation Stack. We now need to modify the method tableView:didSelectRowAtIndexPath: in your KQ2_MainViewController.m source file to create and push the view in response to the user selecting a cell.
Take a look at the tableView:didSelectRowAtIndexPath: method - you will notice a code fragment that is currently commented out. If you uncomment it, you will see the following:
// Navigation logic may go here. Create and push another view controller
<#DetailViewController#> *detailViewController = [[<#DetailViewController#> alloc] initWithNibName:@"<#Nib name#>" bundle:nil];
// ...
// Pass the selected object to the new view controller.
[self.navigationController pushViewController:detailViewController animated:YES];
The first line (starting with <#DetailViewController#> *detailViewController) needs to be replaced with the construction of our own KQ2_DetailViewController. This line simply creates an instance of the view controller, and initialises it with a nib file. If we wanted to use a UITableViewController, then we would do something similar, but replace the initWithNibName:bundle: method with initWithStyle:. The next line:
[self.navigationController pushViewController:detailViewController animated:YES];
takes the newly created view controller and pushes this onto the navigation stack. As this will result in the UINavigationController retaining the view controller, we can then release it ourselves. Replace the first line by creating an instance of the KQ2_DetailViewController view controller as follows (remember to import it’s header file as well):
KQ2_DetailViewController *detailViewController = [[KQ2_DetailViewController alloc]
initWithNibName:@"KQ2_DetailViewController" bundle:nil];
After creating the view controller , but before pushing it onto the navigation stack, we want to call the setter property methods for setMonarchDetails: and setHouseDetails: to pass in the relevant data for the selected cell. Finding the relevant monarch details consists of navigating into the relevant house dictionary (based on the section of the selected cell), and then selecting the monarch (based on the row of the selected cell).
// Unpack the data structure
NSString *key = [[self monarchHouseKeys] objectAtIndex:[indexPath section]];
NSDictionary *monarchDict = [[self myKingsQueensDataModel] objectForKey:key];
NSArray *monarchs = [monarchDict objectForKey:MONARCHS];
[detailViewController setMonarchDetails:[monarchs objectAtIndex:[indexPath row]]];
In the case of the house details, it would be better to only pass the relevant details in a small dictionary, rather than passing in all of the details. This is typically good practice, but can be especially important when passing around mutable data structures, as it avoids accidental modification of data. The following code fragment creates a new non-mutable dictionary, which contains two key-value pairs, for the house title and the house epoch. This is then passed to the view controller, which will retain it. We can then release it, as we no longer need the dictionary ourselves.
// Create a temporary dictionary to pass through the two house elements to the view controller
// This avoids having to pass through potentially several objects.
NSDictionary *tmpHouseDetails = @{HOUSETITLE:[monarchDict objectForKey:HOUSETITLE],
HOUSEEPOCH:[monarchDict objectForKey:HOUSEEPOCH]};
[detailViewController setHouseDetails:tmpHouseDetails];
If you then compile and run the code, you should now be able to select a cell, and view the detail view. Note that the back button will appear (with the text “UK Monarchs”), which, if you select it, will return you to the table. This is due to the UINavigationController, which pops off the view controller (releasing it in the process) in response to the back button being selected.
Full Code
A zip file of the complete project is available from here: KingsQueensNav12.zip. Note that this doesn’t include the additional tasks.