2013/14
This lab introduces you to the Table View, and in particular, the use of the TableViewController, which is used ubiquitously in many “selection” based applications. The different default ways in which content can be displayed in table cells will be demonstrated.
The lab material assumes an understanding of the MVC model and Objective-C 2.0 container classes such as NSArray and NSDictionary, which can be used for data modeling. It also introduces you to the native JSON support, and the new array and dictionary constants, that were added to Xcode 4.5
Lab 3 - KingsQueens (13/14)
15/10/2013

This tutorial introduces you to the notion of displaying data within a table view, and obtaining data from an external source. It involves creating a new type of view controller known as a TableViewController, and attaching this to an empty application (i.e. not starting with a view, but creating one yourself). It will also involve you gaining some additional experience in using NSDictionary and NSArray classes. The aim of the lab is to display elements within a table view, and then respond when a table element is selected. The views will be constructed programmatically in this application, and thus will not involve using Interface Builder or modifying any XIB files.
NOTE: although the full source is included at the bottom of the page, go through the lab itself, and avoid looking at the source. The object is not to get the lab working, but rather to understand how and why the code works!!!
Todays Tasks:
Walkthrough - Step 1: Creating the app and adding a new Table View Controller by hand.
Begin by creating an Empty Application application called KingsQueens12. Type in the name into the Product Name field, and add “KQ1_” to the Class Prefix (see opposite). Ensure that the device Family is set to iPhone, and that you are not using Core Data or Unit Testing. Use Automatic Reference Counting!
Take a look at the files in the project - you will notice that the app delegate source (src) and header file have been created, but there are no view controller or xib files. We will create a new view controller, by adding a new class to the project.
Create a new UIViewController subclass, and give it the name KQ1_ViewController; before clicking Next, ensure that from the drop down menu, your new class is a subclass of UITableViewController, and that you untick the options for “Targeted for iPad” and “With XIB for user interface”. You will be creating the interface programmatically for this view controller,
In the app delegate source file, we now need to create an instance of the new KQ1_ViewController class, calling the initWithStyle method as illustrated below, and set this as the root view controller. Because it will be retained by the window, we do not need to retain this ourselves in a property. Import the KQ1_ViewController at the top of the app delegate, and update the method application:didFinishLaunchingWithOptions: to include the new view controller as follows:
- (BOOL)application:(UIApplication *)application didFinishLaunchingWithOptions:(NSDictionary *)launchOptions
{
self.window = [[UIWindow alloc] initWithFrame:[[UIScreen mainScreen] bounds]];
// ==========================================================
// Override point for customization after application launch.
KQ1_ViewController *vc = [[KQ1_ViewController alloc] initWithStyle:UITableViewStylePlain];
[[self window] setRootViewController:vc];
// ==========================================================
self.window.backgroundColor = [UIColor whiteColor];
[self.window makeKeyAndVisible];
return YES;
}
Note that we are not using the dot notation, even though it is used elsewhere in the template code. You will see references to self.window and [self window] in the code - these are actually the same. However, as the dot syntax is subtly different to that used in Java, try to avoid using it for now. Your whole application:didFinishLaunchingWithOptions: method should look something like the code above (note that I have added the comment lines around the code you have just added). It might vary if you are using an earlier version of XCode, but should still work.
You can try compiling now, but will see some warnings, as we have still not completed all the code necessary for the new view controller. When you run the application, you should see a set of empty cells (separated by horizontal lines, which is also scrollable. This is our table view.
Walkthrough - Step 2: Adding data to the Table View Controller.
In the previous step, we created an empty Table View Controller. This is a special view controller designed for displaying tables, and simplifies their creation by including the table and data delegate methods that would normally have to be defined. In particular, there are several methods used to provide the table view class with information about the data it will display. The following two methods: numberOfSectionsInTableView: and tableView:numberOfRowsInSection: appear in your table view controller subclass, and need to be modified to inform the table how much data you have.
- (NSInteger)numberOfSectionsInTableView:(UITableView *)tableView
{
#warning Potentially incomplete method implementation.
// Return the number of sections.
return 0;
}
Tables can separate data into a number of sections, each with their own header and footer. Once the table knows how many sections there are, it will then call tableView:numberOfRowsInSection: for each section to find out how many table rows there are.
- (NSInteger)tableView:(UITableView *)tableView numberOfRowsInSection:(NSInteger)section
{
#warning Incomplete method implementation.
// Return the number of rows in the section.
return 0;
}
There is a third method tableView:cellForRowAtIndexPath: which will be called every time a new cell in the table needs to be filled in with the data. However, before updating all of these methods, more details needs to be known about the data. In this case, we will add some explicit data to our application.
Start by creating a new NSArray property called myDataArray, making it private to the KQ1_ViewController, by adding it to the class extension of the source:
@interface KQ1_ViewController ()
@property (strong, nonatomic) NSArray *myDataArray;
@end
Then set the contents of this property in initWithStyle, using the contents given below. Note that this uses the new shorthand for creating literals that was introduced in Xcode 4.5. The full implementation of initWithStyle is shown below - the new code has been added between the commented lines.
- (id)initWithStyle:(UITableViewStyle)style
{
self = [super initWithStyle:style];
if (self) {
// Custom initialization
// =================================================
[self setMyDataArray:@[@"Henry VII", @"Henry VIII",
@"Edward VI", @"Jane", @"Mary I", @"Elizabeth I"]];
// =================================================
}
return self;
}
The class can now be updated to determine the number of sections and data elements. Return the value 1 for the number of sections (currently it returns 0). As the data is stored in an array, we can use the count method for the array to determine the number of elements; i.e. [myDataArray count]. Note: once you have updated these two methods, you should remove the line “#warning Incomplete method implementation” from each, to avoid generating the compiler warnings.
Finally, you need to determine what data should appear in each cell of the table. This is done in the tableView:cellForRowAtIndexPath: method. This method is called each time the view constructs a new cell to include in the table. For the moment, we simply want to define the text that should appear in the cell.
There are two methods used to check to see if cells can be dequeued, prior to use. The new method dequeueReusableCellWithIdentifier:forIndexPath: was introduced in iOS6, and will appear in your boilerplate code of KQ1_ViewController. However, this method requires that you create a custom cell class, and register its nib file. We will look at this next week. For now, we want to replace the call with dequeueReusableCellWithIdentifier: (note it only takes a single argument) which will return nil if no dequeued cell, in which case we need to alloc a cell ourselves:
- (UITableViewCell *)tableView:(UITableView *)tableView cellForRowAtIndexPath:(NSIndexPath *)indexPath
{
static NSString *CellIdentifier = @"Cell";
UITableViewCell *cell = [tableView dequeueReusableCellWithIdentifier:CellIdentifier];
if (cell == nil) {
cell = [[UITableViewCell alloc] initWithStyle:UITableViewCellStyleDefault reuseIdentifier:CellIdentifier];
}
// Configure the cell...
[[cell textLabel] setText:[[self myDataArray] objectAtIndex:[indexPath row]]];
return cell;
}
Compile the code and check that the application works.
Walkthrough - Step 3: Sections and Table Styles
So far we have assumed that the table contains only one section. In this step, we extend the number of sections, and include the section title in the list. This involves three stages:
-
1)Creating the data for each section;
-
2)Modifying all methods that pass in an NSIndexPath to return information regarding the appropriate section, as well as the relevant row; and
-
3)Displaying the section titles.
There are several ways of modelling the data; in this case we will use a combination of arrays and dictionaries. One array will hold all of our data, corresponding to four of the Houses of English Monarchs: Lancaster, York, Tudor and Stuart. As each house comprises a title, array of monarchs and period of reign, a dictionary will be used to represent this data.
-
1)Start by creating three C macro constants - these will be used as keys within our dictionary. Note that they are actually string constants, which also makes debugging easier. An advantage of using this approach is that if you mis-spell a string constant as a key later in your code - then you have introduced a bug that will not be picked up by the compiler. However, if you mis-spell a macro constant, then the compiler will complain that it does not know about the mis-spelled macro, which you can then fix. This approach, which tries to ensure that the compiler picks up bugs is part of what is known as defensive programming !!!
-
Add the following lines after the #import in the source file, but before declaring the interface.
#define TITLE @"title"
#define MONARCHS @"monarchs"
#define EPOCH @"epoch"
-
2)Start by creating the method initKingsQueensDataModel which defines our data. Ensure that you also create a property for the array myKingsQueensModel:
- (void) initKingsQueensDataModel {
// ==================
// House of Lancaster
NSDictionary *lancaster = @{TITLE:@"House of Lancaster",
MONARCHS:@[@"Henry IV", @"Henry V", @"Henry VI"],
EPOCH:@"From 1399-1471"};
// ==================
// House of York
NSDictionary *york = @{TITLE:@"House of York",
MONARCHS:@[@"Edward IV", @"Edward V", @"Richard III"],
EPOCH:@"From 1461-1485"};
// ==================
// House of Tudor
NSDictionary *tudor = @{TITLE:@"House of Tudor",
MONARCHS:@[@"Henry VII", @"Henry VIII", @"Edward VI", @"Jane", @"Mary I", @"Elizabeth I"],
EPOCH:@"From 1485-1603"};
// ==================
// House of Stuart
NSDictionary *stuart = @{TITLE:@"House of Stuart",
MONARCHS:@[@"James I", @"Charles I", @"Charles II", @"James II",
@"Mary II", @"William III", @"Anne"],
EPOCH:@"From 1603-1707"};
[self setMyKingsQueensModel:@[lancaster, york, tudor, stuart]];
}
-
Replace the definition of myDataArray in initWithStyle: with a call to the above method.
-
-
2)The next step is to update the data methods to retrieve the correct data. Now that the array myKingQueensModel now contains the four sections, we can update the method numberOfSectionsInTableView: to return the number of elements in this array.
- (NSInteger)numberOfSectionsInTableView:(UITableView *)tableView
{
// Return the number of sections.
return [[self myKingsQueensModel] count];
}
-
However, obtaining the number of rows in each section is a little more convoluted, as we need to first extract the dictionary for each section, find the monarchs array and count the number of elements:
- (NSInteger)tableView:(UITableView *)tableView numberOfRowsInSection:(NSInteger)section
{
// Return the number of rows in the section.
NSDictionary *house = [[self myKingsQueensModel] objectAtIndex:section];
NSArray *monarchs = [house objectForKey:MONARCHS];
return [monarchs count];
}
-
The method tableView:cellForRowAtIndexPath: utilises the NSIndexPath object to refer to an item with a given row and section; this is done using the NSIndexPath row and section methods respectively. Therefore, we can use these to index into the myKingQueensModel array to identify the section and the relevant monarchs array to identify the monarch. As before, to access this array element, we also need to unpack the dictionary:
-
-(UITableViewCell *)tableView:(UITableView *)tableView
cellForRowAtIndexPath:(NSIndexPath *)indexPath
{
...
NSDictionary *house = [[self myKingsQueensModel] objectAtIndex:[indexPath section]];
NSArray *monarchs = [house objectForKey:MONARCHS];
[[cell textLabel] setText:[monarchs objectAtIndex:[indexPath row]]];
return cell;
}
-
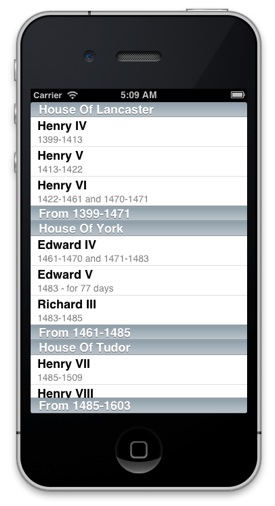
3)If you were to compile the code now, you would see all of the cells appear, as a long list (see opposite, right). Table Views come in two basic styles: “grouped” (UITableViewStyleGrouped) - where cells within a section appear as rows embedded in a rounded rectangle, and “plain” (UITableViewStylePlain - where the cells appear within cells that stretch from each side of the display. The choice of style is determined when the controller was initialised. You can change this by modifying the method application:didFinishLaunchingWithOptions: in the app delegate src file. Compile, and make sure that you can generate both styles of tables.
-
-
The next step is to modify the headers and footers of each section. At each stage, you may want to compile using either table style to see how they look; however, this lab will assume you are using the UITableViewStylePlain style.
-
-
Whenever the beginning or end of a section is displayed, methods are called to determine what should be displayed. We can make use of the other data - the house title and the epoch (i.e. the dates during which the houses reigned) to fill in the headers and footers. Add the following two methods to the KQ1_ViewController source and look at how they appear in both table styles. Note how we unpacked the data from the dictionaries in each case, by using strings as keys.
- (NSString *)tableView:(UITableView *)tableView titleForHeaderInSection:(NSInteger)section
{
NSDictionary *house = [[self myKingsQueensModel] objectAtIndex:section];
return [house objectForKey:TITLE];
}
- (NSString *)tableView:(UITableView *)tableView titleForFooterInSection:(NSInteger)section
{
NSDictionary *house = [[self myKingsQueensModel] objectAtIndex:section];
return [house objectForKey:EPOCH];
}
Walkthrough - Step 4: Cell Styles and loading JSON data
So far we have hard coded the data within the method initKingsQueensDataModel. However, tables are often generated from data obtained from a local file or from the internet. This step walks you through the process of obtaining data from a JSON file (retrieved locally within the bundle, or from a URL).
Modify the initKingsQueensDataModel method within your table-view-controller class so that it loads and unpacks a JSON file containing the same data model as that originally generated programmatically. You will be using the file Monarchs1.json, which was actually created from the myKingQueensModel generated earlier.
The sample code below loads the data from a URL:
- (void) initKingsQueensDataModel {
[self setMyKingsQueensModel:nil];
// Generate the URL request for the JSON data
NSURL *url = [NSURL URLWithString:@"http://www.csc.liv.ac.uk/people/trp/Teaching_Resources/COMP327/Monarchs1.json"];
// Get the contents of the URL
NSData *data = [NSData dataWithContentsOfURL:url];
NSError *error;
[self setMyKingsQueensModel:[NSJSONSerialization JSONObjectWithData:data options:kNilOptions error:&error]];
}
As the JSON data represents the same data structure as that used in the earlier steps the code will just “work”. However, when using JSON in other situations, you should look at the data and understand the structure, so that you can then understand how to modify your code.
Compile the code, and make sure it works as before. Look at the file:
http://www.csc.liv.ac.uk/people/trp/Teaching_Resources/COMP327/Monarchs1.json
to examine the structure of the data. Compare that to the second JSON file, and determine how they differ:
http://www.csc.liv.ac.uk/people/trp/Teaching_Resources/COMP327/Monarchs2.json
In this file, the array corresponding to the dictionary key “monarchs” has changed from containing elements that are strings, to elements that are themselves dictionaries with two keys - “name” and “reigned”. If you modify the url in your application and then try to run the application with the new JSON data source, your application will fail when the method tableView:cellForRowAtIndexPath: is called, as you are now using a different underlying data structure.
Modify this method in the KQ1_ViewController source file to handle the new structure:
// Configure the cell...
NSDictionary *house = [[self myKingsQueensModel] objectAtIndex:[indexPath section]];
NSArray *monarchs = [house objectForKey:MONARCHS];
NSDictionary *kingQueen = [monarchs objectAtIndex:[indexPath row]];
[[cell textLabel] setText:[kingQueen objectForKey:NAME]];
So far, we have been using the default style for each table cell - UITableViewCellStyleDefault - whenever a cell is created in tableView:cellForRowAtIndexPath:. However, there are three other common styles that can be used:
-
•UITableViewCellStyleSubtitle - left-aligns the main title and puts a gray subtitle right under it.
-
•UITableViewCellStyleValue1 - left-aligns the main title and puts the subtitle in blue text and right-aligns it on the right side of the row.
-
•UITableViewCellStyleValue2 - main title in blue and right-aligns it at a point that’s indented from the left side of the row. The subtitle is left-aligned at a short distance to the right of this point.
Note that for UITableViewCellStyleDefault and UITableViewCellStyleSubtitle, images can also be added.
Modify your code to test each style. You are already modifying the main title (using the UILabel textLabel); you can also modify the subtitle (using the UILabel detailTextLabel), by adding the following line:
[[cell detailTextLabel] setText:[kingQueen objectForKey:REIGNED]];
If you try to compile the code, the build will fail with the errors “Use of undeclared identifier” for NAME and REIGNED - this is because we have not defined these macros. At the top of the source file, add the following two lines and recompile.
#define NAME @"name"
#define REIGNED @"reigned"
Walkthrough - Step 5: Handling Cell Selection
In this step, we want to determine some action based on the user selecting a row. When a row is selected, we want to retrieve the associated string from the array (given the indexPath of the selected element). We then display this within an alertView view, before cleaning up and deselecting the row.
Start by looking at the definition of the method didSelectRowAtIndexPath and in particular, the sample code (which is commented out), which provides the stub for creating a new view controller (based on the table cell selection) and pushing this on to a navigationController stack.
NOTE: this assumes that your tableViewController is just one of several view controllers in the application, and that the root view controller is a navigation view controller.
For now, however, we ignore this code, as we simply want to display a message. Construct the message, by retrieving the monarch referenced by the indexPath and identifying their name (see previous step), and including it into a message string:
NSDictionary *house = [[self myKingsQueensModel] objectAtIndex:[indexPath section]];
NSArray *monarchs = [house objectForKey:MONARCHS];
NSDictionary *kingQueen = [monarchs objectAtIndex:[indexPath row]];
NSString *title = [NSString stringWithFormat:@"You selected %@.",
[kingQueen objectForKey:@"name"]];
Then create an instance of the UIAlertView class, and set the title and message content as shown below. This class is useful for creating popups, which can also include additional buttons to request confirmation from a user. For now, we simply want a dismiss button. Once the popup appears (by calling the show method on it), we should clean up the memory (by releasing the instance; the instance will be retained by the application once the show method is called until the popup is closed, therefore we do not need to keep a copy ourselves) and then deselecting the row. Note that we set animated to YES so that the selection fades nicely! Ass the following code after constructing the string title, and compile the code, checking to see that it works.
UIAlertView *alertView = [[UIAlertView alloc] initWithTitle:title
message:@"Now what?" delegate:nil
cancelButtonTitle:@"Dismiss" otherButtonTitles:nil];
[alertView show];
[tableView deselectRowAtIndexPath:indexPath animated:YES];
Additional Task 1
Try modifying the code to also display an image next to each of the table entries. Start by identifying a single image file, adding it to your project, and using the following code to add it to the cell:
UIImage *crownImage = [UIImage imageNamed:@"crown.png"];
[[cell imageView] setImage:crownImage];
This assumes that you have maned the image file crown.png
Additional Task 2
Modify the method tableView:cellForRowAtIndexPath: to log a message every time a cell is generated. You can use the function NSLog(); for this. Open the log window in Xcode, and then, whilst running the application, scroll the table to see what happens each time a cell is created. Try using the sample code below to determine when a cell has been created, or dequeued:
...
if (cell == nil) {
cell = [[UITableViewCell alloc] initWithStyle:UITableViewCellStyleSubtitle reuseIdentifier:CellIdentifier];
NSLog(@"We've just allocated a new cell for section %d, row %d", [indexPath section], [indexPath row]);
} else {
NSLog(@"An old cell was dequeued for section %d, row %d", [indexPath section], [indexPath row]);
}
...
Additional Task 3
Download the JSON file and add it to your project. Modify the method initKingsQueensDataModel to load this file from the local bundle (instead from from the URL), and ensure that this works. Then try modifying the JSON file to add additional key-value pairs to each monarch, or different data to the houses. You can independently check whether your JSON file is valid by visiting the JSON Lint validator.
Additional Task 4
Try modifying the JSON file to include the URL of an image for each house, or for each monarch. Modify your code to load this image from the URL, and add it to the cells. Note how the loading of each image can affect the responsiveness of your application - this is something we will look at in future labs.
Full Code
A zip file of the complete project is available from here: KingsQueens12.zip. Note that this doesn’t include the additional tasks.