2011/12
This lab continues to explore the use of Table Views, and examines how table cells can be edited, deleted and reordered. It also explores how cells can be modified or custom made.
The lab material assumes an understanding of the MVC model and mutable versions of Objective-C 2.0 container classes, which we use for data modelling.
Lab 6 - KingsQueens Part B (11/12)
08/11/2011


Introduction
This tutorial continues from Lab 5 (Kings and Queens Part A) to explore how tables can be used to organise and present data, by allowing users to add, edit or reorganise cells. In addition, it explores how table cells can be modified or custom made to allow fine-grain design of content on the display, and introduces you to the notion of modal views; in particular using such views to obtain information from the user. It will also involve you gaining some additional experience in using NSDictionary and NSArray classes, and whilst the views will be constructed programmatically, we will explore creating table cells using Interface Builder or modifying any XIB files.
Todays Tasks:
Walkthrough - Step 1: Create a new version of the KingsQueens App using a Table View Controller.
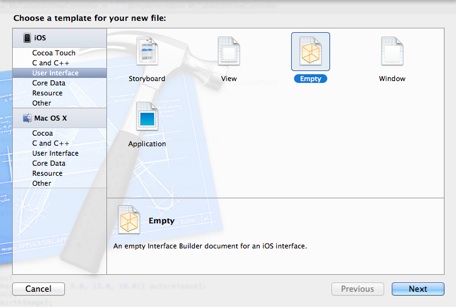
In this lab, we will start again from scratch to create our app, as a new version of the data source (in JSON) will be used. Begin by creating an Empty Application application called KingsQueens2 (note the change in name). Type in the name into the Product Name field and the Class Prefix, As before, ensure that the device Family is set to iPhone, and that you are not using Core Data, Automatic Reference Counting or Unit Testing.

This version of the app will exploit a navigation view controller to provide a navigation bar, which will allow us to include edit buttons, etc. To do this, we will create an instance of of a UINavigationController, and initialise this by pushing an instance of our MyTableEditViewController controller, using the method initWithRootViewController:.
In your App Delegate header file, add an instance of class UINavigationController, called myNavigationController. Your app delegate header file should look something like this (note we have not created a property for the ivar - as we don’t want this exposed elsewhere for now):
#import <UIKit/UIKit.h>
@interface KingsQueens2AppDelegate : UIResponder <UIApplicationDelegate> {
UINavigationController *myNavigationController;
}
@property (strong, nonatomic) UIWindow *window;
@end
Create an instance of the new MyTableEditViewController class in the app delegate src file, calling the initWithStyle method as before, using the style initWithStyle:UITableViewStylePlain. Initialise the UINavigationController ivar, and then attach the UINavigationController‘s view to the subview of the window. Remember to release myNavigationController in the dealloc method - note that we don’t need to worry about deallocating the instance of our MyTableEditViewController as this will be managed by the UINavigationController. The new code for application:didFinishLaunchingWithOptions: is given below:
- (BOOL)application:(UIApplication *)application didFinishLaunchingWithOptions:(NSDictionary *)launchOptions
{
self.window = [[[UIWindow alloc] initWithFrame:[[UIScreen mainScreen] bounds]] autorelease];
// Override point for customization after application launch.
// ===============================================================================
MyTableEditViewController *myRootViewController = [[MyTableEditViewController alloc] initWithStyle:UITableViewStylePlain];
myNavigationController = [[UINavigationController alloc] initWithRootViewController:myRootViewController];
[myRootViewController release]; // This has been retained by the navigation controller
[[self window] addSubview:[myNavigationController view]];
// ===============================================================================
self.window.backgroundColor = [UIColor whiteColor];
[self.window makeKeyAndVisible];
return YES;
}
Our MyTableEditViewController will now appear with a blank Navigation Bar. By default, the view controller property title will appear in the centre of this Bar. To set this title, add the following line to the MyTableEditViewController‘s viewDidLoad method:
[self setTitle:@"KingsQueens 2"];
In this version, we will be using a new data model which organises the data into a single array of elements (thus we will be assuming a table with a single section for now), where each element is a dictionary containing several values. We will be loading this into our application using JSON, and then copying it into a Mutable array to allow it to be edited. Take a look at the file:
http://www.csc.liv.ac.uk/people/trp/Teaching_Resources/COMP327/Monarchs3.json
Add the source of the JSON parser to the project (see step 4 in Lab 5 (Kings and Queens Part A)), and declare the ivar myEditableKingQueensModel in the MyTableEditViewController header file as follows:
@interface MyTableEditViewController : UITableViewController {
NSMutableArray *myEditableKingQueensModel;
}
Note that myEditableKingQueensModel is a mutable array - this is because we will be modifying its contents later in this Lab. Create a variant of the method initKingsQueensDataModel, (see below). Note how we are loading in the JSON data as before, but instead of retaining the enclosing array, we create a new mutable array with the same contents.
- (void) initKingsQueensDataModel {
myEditableKingQueensModel = nil;
// Generate the URL request for the JSON data
NSURL *url = [NSURL URLWithString:@"http://www.csc.liv.ac.uk/people/trp/Teaching_Resources/COMP327/Monarchs3.json"];
// Get the contents of the URL as a string
NSString *jsonString = [NSString stringWithContentsOfURL:url
encoding:NSUTF8StringEncoding error:nil];
if (jsonString)
myEditableKingQueensModel = [[NSMutableArray alloc] initWithArray:[jsonString JSONValue]];
}
To finish, we now need to complete the data source delegate methods:
-
1)In viewDidLoad, call initKingsQueensDataModel
-
2)In numberOfSectionsInTableView, return 1
-
3)In tableView:numberOfRowsInSection return the number of elements in myEditableKingQueensModel
-
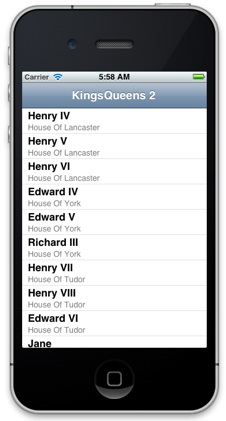
4)In tableView:cellForRowAtIndexPath:, modify the code to use the cell style UITableViewCellStyleSubtitle, and configure the cell using the following code:
// Configure the cell...
NSDictionary *kingQueen = [myEditableKingQueensModel objectAtIndex:[indexPath row]];
[[cell textLabel] setText:[kingQueen objectForKey:@"name"]];
[[cell detailTextLabel] setText:[kingQueen objectForKey:@"title"]];
-
5)Remember to remove the warning statements from numberOfSectionsInTableView and tableView:numberOfRowsInSection:
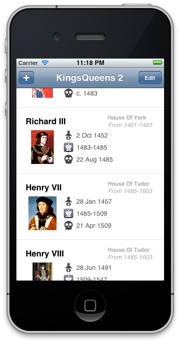
Compile the code, and ensure that it looks similar to the screenshot at the start of this step.
Walkthrough - Step 2: Reorganising and delete entries by providing an edit button and enabling swipe-to-delete.
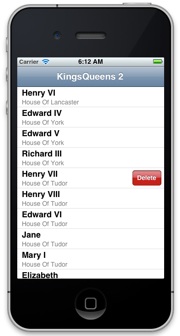
In this step we will enable the “swipe-to-delete” functionality supported by the method tableView:commitEditingStyle:forRowAtIndexPath:. Uncomment this method, and take a look at its contents. For now, we are only considering the case where we delete an element (i.e. when the value of editingStyle is UITableViewCellEditingStyleDelete. The code in the method is responsible for deleting the row from the table view, and animating its deletion. However, you should also ensure that any change in this table view is reflected in your data source; i.e. the corresponding element should also be removed from your array. If not, the application will probably crash, due to a mismatch between the table’s understanding of the data model and the actual data model!
Start by removing the element from the array myEditableKingQueensModel by calling the method removeObjectAtIndex using the row in the index path as the argument. Then delete the row in the index path (see the code fragment below). Compile the code and then try deleting elements from the running application by wiping (from left to right) along one of the entries in the table view.
// Override to support editing the table view.
- (void)tableView:(UITableView *)tableView commitEditingStyle:(UITableViewCellEditingStyle)editingStyle
forRowAtIndexPath:(NSIndexPath *)indexPath
{
if (editingStyle == UITableViewCellEditingStyleDelete) {
// Remove the selected element from our array
[myEditableKingQueensModel removeObjectAtIndex:[indexPath row]];
// Delete the row from the data source
[tableView deleteRowsAtIndexPaths:[NSArray arrayWithObject:indexPath]
withRowAnimation:UITableViewRowAnimationFade];
}
else if (editingStyle == UITableViewCellEditingStyleInsert) {
// Create a new instance of the appropriate class, insert it
// into the array, and add a new row to the table view
}
}
Compile the code, and try “swiping” a row to verify that it can be deleted.
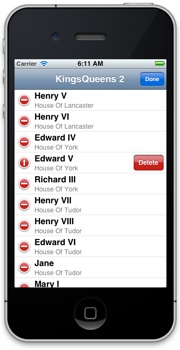
Often, tables also offer the possibility of deleting entries using an “Edit” button. This offers similar functionality to swiping to delete, and causes the method tableView:commitEditingStyle:forRowAtIndexPath to be called. As this functionality is offered within the MyTableEditViewController’s parent class - UITableViewController, this functionality can be enabled simply by setting one of the navigation bar buttons to be the MyTableEditViewController ‘s edit button item. In Xcode 4.2, this line is provided in the viewDidLoad method, but commented out. Uncomment the following line:
// Uncomment the following line to display an Edit button
// in the navigation bar for this view controller.
self.navigationItem.rightBarButtonItem = self.editButtonItem;
Compile the code, and try using the Edit button to delete items from the list.
When this Edit button is pressed, it sets the edit property of your table view to YES. This would be equivalent to calling the method:
[self setEditing:YES animated:YES];
Note that we do not add this ourselves to the code, but it could be added to an Action if you wanted another way to enable editing.
The basic algorithm for updating the table comprises three basic steps:
-
1.Get the element that is being moved from the array
-
2.Delete the element itself from the array
-
3.Reinsert the element in the array
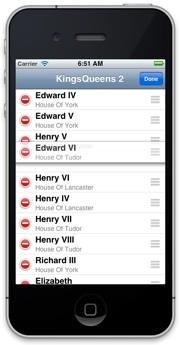
As the elements in the array are objects, we can make use of the retain count to ensure they are not deleted. Start by extracting an instance from position fromIndexPath in the array. We will need to retain this, as we want to ensure that the element itself is not dealloc’d when deleted from the array. We then delete this element from the array, using the removeObjectAtIndex method. Then we can re-insert the element back in the array using insertObject:atIndex: which will result in the array retaining the object. Once this is done, we no longer need it - at which point we release our reference to that object. The code for this is given below. Add this to the MyTableEditViewController source, compile and test.
// Override to support rearranging the table view.
- (void)tableView:(UITableView *)tableView moveRowAtIndexPath:(NSIndexPath *)fromIndexPath toIndexPath:(NSIndexPath *)toIndexPath
{
// obtain a reference to the data element and retain
// it, as we are about to delete it from the array
NSDictionary *migrantDataObject = [myEditableKingQueensModel
objectAtIndex:[fromIndexPath row]];
[migrantDataObject retain];
// Delete the old element from the array,
// and reinsert our retained copy in the new position
[myEditableKingQueensModel removeObjectAtIndex:[fromIndexPath row]];
[myEditableKingQueensModel insertObject:migrantDataObject atIndex:[toIndexPath row]];
// Adding the object back into the array will retain it, so we can release our ownership
[migrantDataObject release];
}
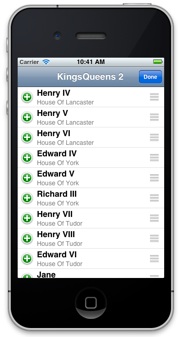
So far we have looked at re-organising and deleting elements from a table (and the underlying data model). Adding elements to lists is also simple, however, it raises further challenges, including where the new element comes from, and where to insert the element in the table. UITableViews can support two types of edits on cells: insertion and deletion. So far we have seen deletion, indicated by the red circles. This is the default action. However, it is also possible to change this behaviour by over-riding the method tableView:editingStyleForRowAtIndexPath:. This method can be used to determine whether or not edits should be to delete an entry, or insert an entry, for a given index path by returning either UITableViewCellEditingStyleDelete or UITableViewCellEditingStyleInsert respectively. Insert-edits are represented by green circles (see opposite).
However, one can use tableView:editingStyleForRowAtIndexPath: when it is clear what type of edit is to be done. In this application, however, we are going to assume that all edits performed using the edit button are deletes, and that the insertion of an element is performed by clicking on an “add” button. We start by adding this button to the left of the navigation bar, by adding the following line to the viewDidLoad method:
UIBarButtonItem *addButton = [[UIBarButtonItem alloc]
initWithBarButtonSystemItem:UIBarButtonSystemItemAdd
target:self
action:@selector(add:)];
[[self navigationItem] setLeftBarButtonItem:addButton];
[addButton release];
Notice that we have added an action on a target, which is invoked when the button is pressed. The action corresponds to the add: method, which will be implemented in “self” i.e. in the MyTableEditViewController src. This method needs to do the following actions:
-
1)Get the data for the new element
-
2)Create a new entry that can be inserted into the array
-
3)Insert the element into the table
-
4)Scroll the table to the location of the newly added element
We will address the problem of getting data for the new element shortly - for now we will simply assume default strings fro the entry. To create the new entry, we will create a new method called createNewKingQueen (below):
- (NSDictionary *) createNewKingQueen
{
NSDictionary *newElement = [NSDictionary dictionaryWithObjectsAndKeys:
@"No Name", @"name",
@"No Title", @"title",
@"No Epoch", @"epoch",
@"No Birth Date", @"born",
@"No date of death", @"died",
@"No Image", @"image",
@"No Thumb", @"thumb",
@"No reign", @"reigned",
nil];
// Note that as this was class-factory created, this will be autoreleased!
return newElement;
}
Add this method to the file MyTableEditViewController src file, and declare its prototype in the corresponding header file. All the method does is create a single NSDictionary element with a set of standard keys, and returns this to the caller. Note that we are using a class factory, so the element will be managed by the autorelease pool at some point.
NOTE: For now, we are using strings as keys to identify elements in the dictionary, as the keys should be something of type NSObject. However, there is always the danger of mistyping these keys, and their use can make code maintenance problematic. A far better solution would be to specify #define macros in the header file, to provide a symbolic representation; i.e.:
#define NAME @"name"
#define TITLE @"title"
...
and then use these in our code, i.e.
NSDictionary *newElement = [NSDictionary dictionaryWithObjectsAndKeys:
@"No Name", NAME,
@"No Title", TITLE,
However, for now we will continue to explicitly use strings in this lab.
We can now call createNewKingQueen to create our object and insert it into our array. Create the add: method (which will be called when the new add button is pressed in the navigation bar), and insert the element created from createNewKingQueen into the zero’th position in our array. This will shift all the other elements one position along in our array. Note that we don’t worry about ownership of the element created by calling createNewKingQueen, as it will be automatically retained when added to the array.
- (void)add:(id)sender
{
[myEditableKingQueensModel insertObject:[self createNewKingQueen] atIndex:0];
// Still not finished - as we need to update the table !!!
}
Although we have added the element to the array, we have still not updated the table, and thus there is an inconsistency between the array and what is displayed. The simple approach would be to tell the UITableView (managed by our MyTableEditViewController ) to reload the data, by calling the reloadData method. Try adding the following line to the end of the add method, and see what happens:
[self.tableView reloadData];
When you compile and run the code, you will notice that whenever the “add” button is pressed, the table will be updated. A more elegant solution would be to update the table so that the element appears animated - which gives a visual cue to the user that the table has changed. In addition, if the user has scrolled down the list, they will not see the new element. The method insertRowsAtIndexPaths:withRowAnimation: can be used to add one (or more) elements to a table, with animation; however, we will also need to create an NSIndexPath to refer to the location in which it is inserted. Likewise, scrollToRowAtIndexPath:atScrollPosition:animated: can be used to scroll to a given index . Replace the add: method with the following code; compile, and see how the two approaches differ:
- (void)add:(id)sender
{
[myEditableKingQueensModel insertObject:[self createNewKingQueen] atIndex:0];
NSIndexPath *indexPath = [NSIndexPath indexPathForRow:0 inSection:0];
[[self tableView] insertRowsAtIndexPaths:[NSArray arrayWithObject:indexPath]
withRowAnimation:UITableViewRowAnimationFade];
[[self tableView] scrollToRowAtIndexPath:indexPath
atScrollPosition:UITableViewScrollPositionTop
animated:YES];
}
In the above method, the table view itself (which is managed by the table view controller) can be accessed by the property tableView. By accessing this object, we can further modify and configure how the table itself looks. This we examine in the next step.
Walkthrough - Step 4: Customising Table Cells Programmatically
TableViews are highly configurable, but sometimes it is desirable to modify the rows, or cells, to change the way content is displayed, or to add new content. As we saw in Lab 5 (Kings and Queens Part A), four different UITableViewCell styles are available:
-
•UITableViewCellStyleDefault - left-aligns the main title
-
•UITableViewCellStyleSubtitle - left-aligns the main title and puts a gray subtitle right under it.
-
•UITableViewCellStyleValue1 - left-aligns the main title and puts the subtitle in blue text and right-aligns it on the right side of the row.
-
•UITableViewCellStyleValue2 - main title in blue and right-aligns it at a point that’s indented from the left side of the row. The subtitle is left-aligned at a short distance to the right of this point.
These cells are sufficient for most applications, and also offer the ability to display images, accessory views, and the font, colour, etc can be modified, as well as having characteristics change when cells are selected. However, there are circumstances where the default styles are not appropriate for a given application. In which case, it is possible to customise these styles by adding subviews to the content view of the cell programmatically, or create and load custom table-view cells from nib files, or subclass the UICellView class. In the remainder of this lab, we will focus on the first two methods.
The first approach involves creating new subviews; in this case we will create two new labels, and add two images next to these labels. The content view of the cell can be obtained by calling [cell contentView]; views created programmatically can then be added to this view.
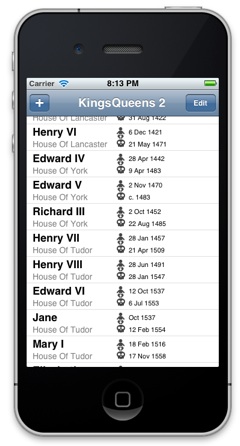
Start by declaring two UILabels and two UIImages in the method tableView:cellForRowAtIndexPath:, for the birth and death labels (for each monarch) and for the images that will be used to represent these two.
The labels and image views then need to be created. As cells are typically reused, these views need only ben created when the cells are initialised, not every time that they are used. Start by creating the view programmatically; note that we create a CGRect that describes the size and location of the label (i.e. origin = (170, 5) and its size is 80 wide and 15 high). The font is set (as a smaller font is required for our custom cell), and we then set a tag (we’ll return to this later). Finally, the cell is attached as a subview to the cell’s content view.
birthLabel = [[[UILabel alloc]
initWithFrame:CGRectMake(170.0, 5.0, 80.0, 15.0)] autorelease];
[birthLabel setFont:[UIFont systemFontOfSize:11.0]];
[birthLabel setTag:BIRTHLABEL_TAG];
[[cell contentView] addSubview:birthLabel];
When a cell is reused, the attached views are also reused. However, this means that there needs to be some means of accessing the view from within the cell, so that its value can be changed. A tag is an identifier of a view, and can be used to extract a view from the view hierarchy by using the method viewWithTag:. This is why a tag label (for example BIRTHLABEL_TAG in the code above). Therefore, to get this label when reusing a cell, we can simply retrieve it as follows:
birthLabel = (UILabel *)[[cell contentView] viewWithTag:BIRTHLABEL_TAG];
Note that the tags should actually be integers - typically #define macros are used to define these tags. All that remains is to set the value of each of the new custom views.
In the MyTableEditViewController header file, add the following macros:
#define BIRTHLABEL_TAG 1
#define DEATHLABEL_TAG 2
#define BIRTHIMAGE_TAG 3
#define DEATHIMAGE_TAG 4
Replace the method tableView:cellForRowAtIndexPath: in the MyTableEditViewController src file with the following code:
- (UITableViewCell *)tableView:(UITableView *)tableView cellForRowAtIndexPath:(NSIndexPath *)indexPath
{
static NSString *CellIdentifier = @"MonarchCell";
UILabel *birthLabel, *deathLabel;
UIImageView *birthImage, *deathImage;
UITableViewCell *cell = [tableView dequeueReusableCellWithIdentifier:CellIdentifier];
if (cell == nil) {
cell = [[[UITableViewCell alloc] initWithStyle:UITableViewCellStyleSubtitle
reuseIdentifier:CellIdentifier] autorelease];
birthLabel = [[[UILabel alloc]
initWithFrame:CGRectMake(170.0, 5.0, 80.0, 15.0)] autorelease];
[birthLabel setFont:[UIFont systemFontOfSize:11.0]];
[birthLabel setTag:BIRTHLABEL_TAG];
[[cell contentView] addSubview:birthLabel];
deathLabel = [[[UILabel alloc]
initWithFrame:CGRectMake(170.0, 25.0, 80.0, 15.0)] autorelease];
[deathLabel setFont:[UIFont systemFontOfSize:11.0]];
[deathLabel setTag:DEATHLABEL_TAG];
[[cell contentView] addSubview:deathLabel];
birthImage = [[[UIImageView alloc]
initWithFrame:CGRectMake(150.0, 5.0, 13.0, 19.0)] autorelease];
[birthImage setTag:BIRTHIMAGE_TAG];
[[cell contentView] addSubview:birthImage];
deathImage = [[[UIImageView alloc]
initWithFrame:CGRectMake(150.0, 25.0, 14.0, 13.0)] autorelease];
[deathImage setTag:DEATHIMAGE_TAG];
[[cell contentView] addSubview:deathImage];
} else {
birthLabel = (UILabel *)[[cell contentView] viewWithTag:BIRTHLABEL_TAG];
deathLabel = (UILabel *)[[cell contentView] viewWithTag:DEATHLABEL_TAG];
birthImage = (UIImageView *)[[cell contentView] viewWithTag:BIRTHIMAGE_TAG];
deathImage = (UIImageView *)[[cell contentView] viewWithTag:DEATHIMAGE_TAG];
}
// Configure the cell...
NSDictionary *kingQueen = [myEditableKingQueensModel objectAtIndex:[indexPath row]];
[[cell textLabel] setText:[kingQueen objectForKey:@"name"]];
[[cell detailTextLabel] setText:[kingQueen objectForKey:@"title"]];
[birthLabel setText:[kingQueen objectForKey:@"born"]];
[deathLabel setText:[kingQueen objectForKey:@"died"]];
NSString *birthImagePath = [[NSBundle mainBundle] pathForResource:@"76-baby" ofType:@"png"];
UIImage *theBirthImage = [UIImage imageWithContentsOfFile:birthImagePath];
[birthImage setImage:theBirthImage];
NSString *deathImagePath = [[NSBundle mainBundle] pathForResource:@"21-skull" ofType:@"png"];
UIImage *theDeathImage = [UIImage imageWithContentsOfFile:deathImagePath];
[deathImage setImage:theDeathImage];
return cell;
}
before compiling, you will need the images used. These two images have been taken from the royalty free Glyphish set of mobile app icons, which is a good repository for button and tab-bar icons. In particular, you will need the following two files:
_files/76-baby.png)
_files/21-skull.png)
Add these to your project and compile. Take a closer look at the code above to be sure you understand what it does.
Walkthrough - Step 5: Customising Table Cells using NIB files
The way in which cells can be created can differ, depending on whether you have a small number of specialist cells that vary (e.g. when configuring an application), or whether the number of times a specific cells will appear could be unbounded (i.e. as in our app). In the first case, a single NIB file would typically contain all the different cell definitions. However, in this lab we assume the number of times the cell will appear is unknown, and thus we will create a single cell that is defined within its own NIB file.
Start by adding an outlet property for our new cell that we will load from the NIB. Declare it in the MyTableEditViewController header file (see the code below) and then synthesise it in the MyTableEditViewController src file.
@interface MyTableEditViewController : UITableViewController {
NSMutableArray *myEditableKingQueensModel;
UITableViewCell *myCustomMonarchCell;
}
@property (nonatomic, retain) IBOutlet UITableViewCell *myCustomMonarchCell;
@end
Go to the Objects list in the right hand menu (i.e. where you normally find view objects such as labels etc), and scroll until you find Table View Cell. Drag one of these onto the main screen - once done, you should see the cell, and a view corresponding to this cell will appear under the First Responder icon. This is the cell we will modify.
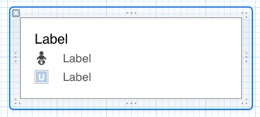
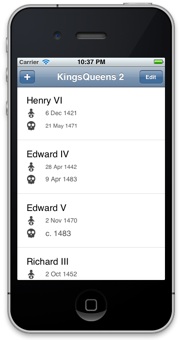
Add three labels (corresponding to the Monarch’s name, birth, and death) and two UIImages, which can be set to the two images used in the previous step. Resize the cell (for example, make it 116 pixels high) to make space for these elements. You can configure the elements to change the way they look; however as in the previous step, each interface element will need a tag integer. Select each label, and in the Attribute Inspector, set the tag value (as a number). Use the same values as for the previous step (i.e. 1 for BIRTHLABEL_TAG and 2 for DEATHLABEL_TAG. Create a new value (e.g. 5) for the label you will use for the monarch’s name; we will define this later in the MyTableEditViewController header file.

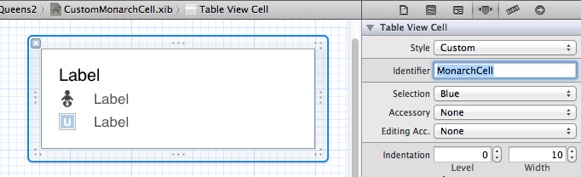
Select the cell itself, and in the Attribute Inspector, set the Identifier as MonarchCell. If you recall, we used this identifier in the method tableView:cellForRowAtIndexPath: in the previous step. To reuse a cell it needs an identifier; this is especially important if you have more than one cell type in any table.
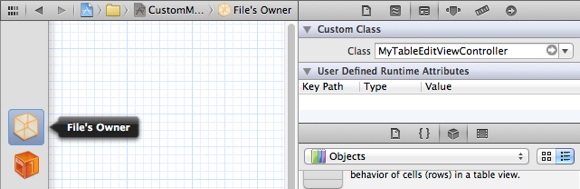
Next, we need to identify the cell’s File’s Owner. Select the File’s Owner element on the left hand side of the NIB editor, and in the Identity Inspector, change the Class to MyTableEditViewController.
Finally, associate the cell to the outlet property that was added to the MyTableEditViewController header file. Right click the File’s Owner, and link the property myCustomMonarchCell to the Table View Cell. We are now ready to load this Nib file from our table view controller, and set values to the cell’s interface objects using the tag names.
Add the following macro to the MyTableEditViewController header file:
#define MONARCHLABEL_TAG 5
Replace the method tableView:cellForRowAtIndexPath: in the MyTableEditViewController src file with the following code:
- (UITableViewCell *)tableView:(UITableView *)tableView cellForRowAtIndexPath:(NSIndexPath *)indexPath
{
static NSString *CellIdentifier = @"MonarchCell";
UITableViewCell *cell = [tableView dequeueReusableCellWithIdentifier:CellIdentifier];
if (cell == nil) {
[[NSBundle mainBundle] loadNibNamed:@"CustomMonarchCell" owner:self options:nil];
cell = myCustomMonarchCell;
[self setMyCustomMonarchCell:nil];
}
UILabel *monarchLabel = (UILabel *)[cell viewWithTag:MONARCHLABEL_TAG];
UILabel *birthLabel = (UILabel *)[cell viewWithTag:BIRTHLABEL_TAG];
UILabel *deathLabel = (UILabel *)[cell viewWithTag:DEATHLABEL_TAG];
NSDictionary *kingQueen = [myEditableKingQueensModel objectAtIndex:[indexPath row]];
[monarchLabel setText:[kingQueen objectForKey:@"name"]];
[birthLabel setText:[kingQueen objectForKey:@"born"]];
[deathLabel setText:[kingQueen objectForKey:@"died"]];
return cell;
}
Note that we load in the cell from Nib file with loadNibNamed:owner:options:; this will automatically associate the cell object in memory with the outlet property myCustomMonarchCell. The cell object is then assigned to the variable cell, and the outlet property myCustomMonarchCell is reset to nil; ready for the next time the nib is loaded.
The very last thing is to change the row height to that of the custom cell. This can be problematic, as prior to loading any cells, it is difficult to know the height. One approach would be to load a cell from the Nib file, and then look at the cells bounds (see below). Add the following lines to the viewDidLoad method:
[[NSBundle mainBundle] loadNibNamed:@"CustomMonarchCell" owner:self options:nil];
CGRect cellRect = [myCustomMonarchCell bounds];
[self setMyCustomMonarchCell:nil];
[[self tableView] setRowHeight:cellRect.size.height];
Additional Task 1
Try modifying the code to display all of the non-image details given for each Monarch. Once this is working, try loading the thumb image into each cell. You will notice how this can slow the application down - when first displaying each cell, and then when loading a new image. We will soon look at how this data could be cached, and how making use of multithreading can be used to load the images without affecting the application performance.
Hint - add a UIImageView to the cell, and then set it by extracting the thumb URL, creating a URL object, and using this to load the image. Note that you need to load the image initially as a NSData object.
UIImageView *thumbImageView = (UIImageView *)[cell viewWithTag:THUMBIMAGE_TAG];
NSURL *url = [NSURL URLWithString:[kingQueen objectForKey:@"thumb"]];
[thumbImageView setImage:[UIImage imageWithData:[NSData dataWithContentsOfURL:url]]];
Additional Task 2
Take a look at the Table View Programming Guide, which can be found in the Organiser’s documentation.